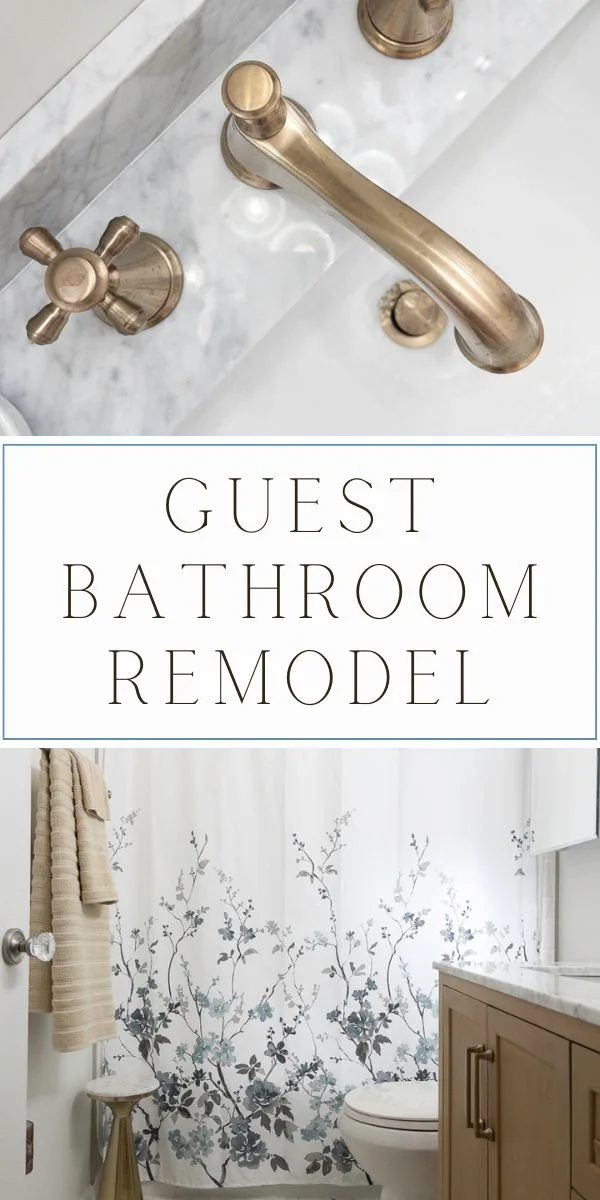
Today, we're focusing on a bathroom remodeling project at my sister's house. The bathroom was stripped to its bare bones to address some issues and is now being rebuilt for better functionality.

It just happens that my sister's house was the house we grew up in. Our dad was a jack of all trades, and long ago, with the help of friends, they built an addition to the small house.
This addition is where the guest bathroom is now.
After many years, it was time to gut and rebuild this guest bathroom. The old bathroom had space planning issues and water damage under the tub and around the window that needed to be fixed.
So I am going to begin by showing you a before of the bathroom. It was a beautiful, classic '60s design.
Then, we will take a tour of the freshly renovated bathroom and see what we did to solve many problems, along with the little details that make it function so much better and aesthetically pleasing.
Spoiler alert: guests will love the new small guest bathroom even more than the old one.
Remodeling a Bathroom
Before we begin looking at the post-bathroom renovation, let's start with the before.
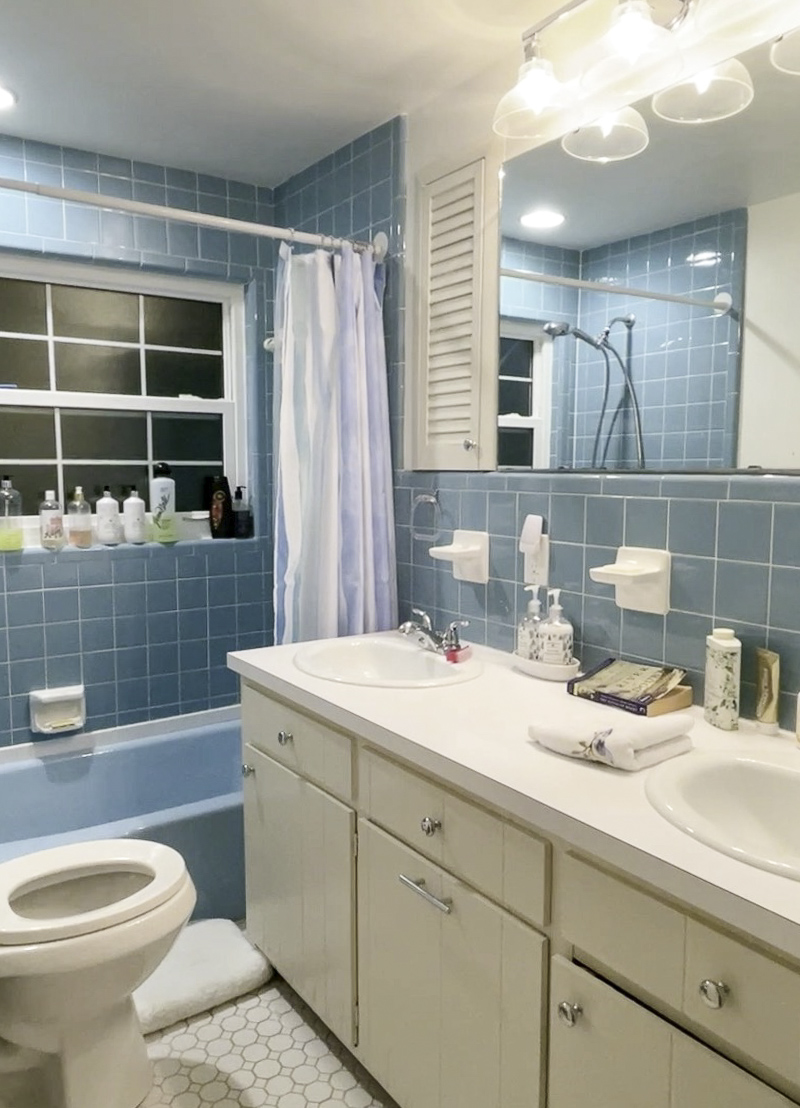
Back in the day, this was quite the bathroom design.
A long counter with a double vanity elongated the bathroom, and a large mirror really made it feel large.
At that time, everything was color-coordinated in a monochromatic design. That was high-end decorating!
This bathroom's theme was all blue: blue wall tile, blue floor, blue wall tiles, blue tub and tile surround, blue sink, toilet, and so on. You get the picture.
At one time, it had lights hanging from the ceiling over the vanity. Having a unique design, these lights were a statement piece.
The cabinetry was custom; even though you cannot see it, a hamper cabinet is in the middle. You pull the door out and down to reveal the laundry hamper.
Best designs are in the details!
And did you notice the medicine cabinets on each side? Built into the design, they were truly designer.
These are only some designer details, but you can see why it was hard to gut this whole bathroom and start over.
At that time, my parents didn't make much money, and after an Uncle lived there for a while to recover from an accident, he gifted them money to renovate the bathrooms.
My mom and dad felt like royalty with such nice baths!
Now, let's look at my design plan recommendations as an interior designer before the bathroom remodeling project began.
Guest Bathroom Remodel Design Plan

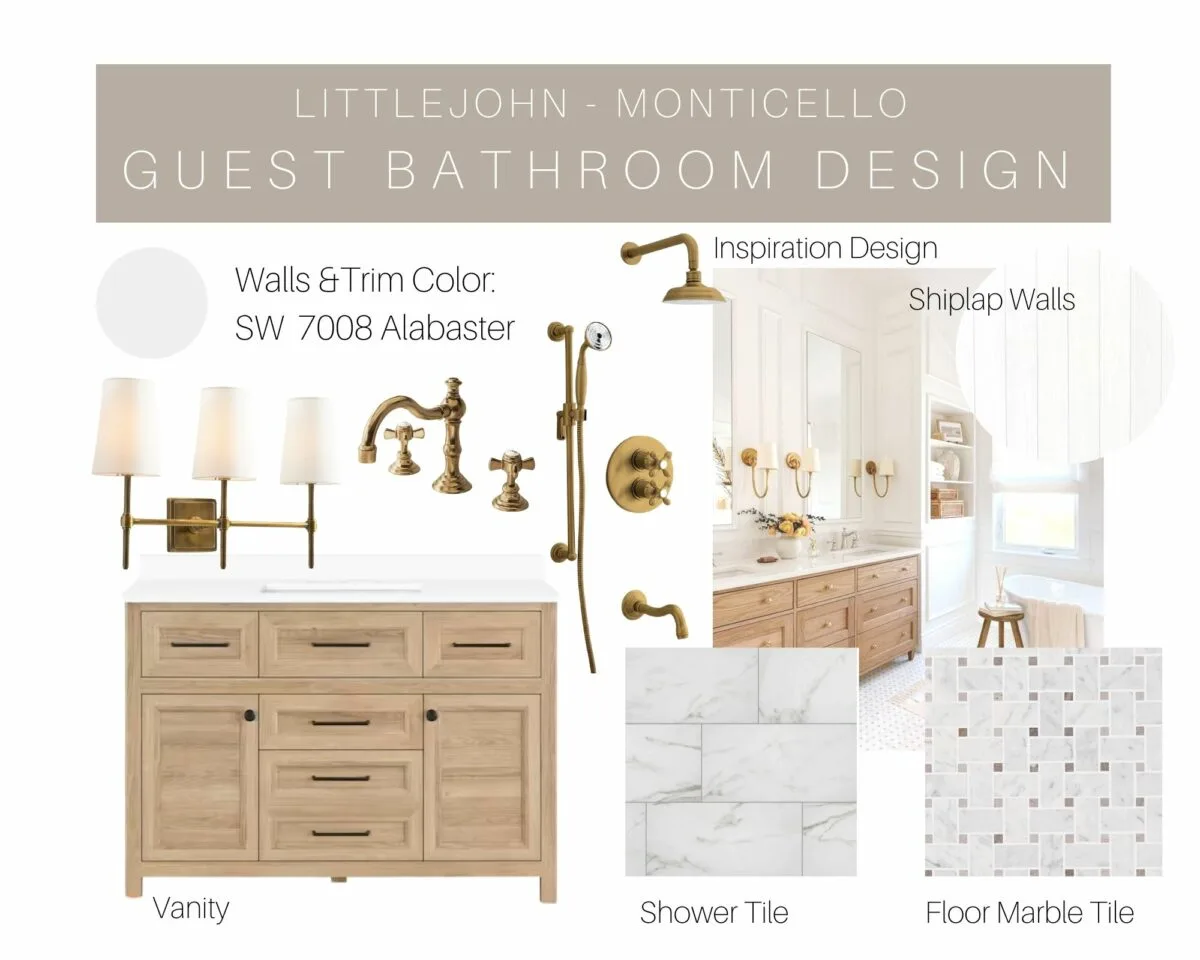
This time, my sister wanted something more neutral, light, and bright so she could change the decor to different colors whenever she pleased. Because the bathroom is small, storage is important, so we also had to think about making the space functional.
Our goal was an aesthetically pleasing bathroom with quality pieces and functionality.
To begin with, I drafted a floor plan of the bathroom to see how wide a vanity we could use.
Once I had the design set, I searched and found this light wood vanity to keep with the light and bright colors but give a warm element to the all-white room. We will talk more about the vanity later.
Next, I added marble tiles, but I recommended ones with gray and beige veining to tie in the wood vanity. I also added aged brass faucets and such.
Last, we decided to keep the wall color the same as the walls in the rest of the house.
If you are thinking of renovating your bathroom, read on. Our experience might prepare you for your construction project.
Construction Supplies
- Shower Faucet: Cassidy Monitor 17 Series H2Okinetic Tub And Shower Trim – Champagne Bronze
- Shower Hand Held: Universal Showering Components 7 Setting Suredock Magnetic Hand Shower – Champagne Bronze
- Tub Plug: Lift And Turn Trim Kit Brushed Bronze
- Control Valve: Multichoice Universal Tub And Shower Rough Universal Inlets / Outlets
- Vanity Light: KSANA Gold Vanity Lights, 3-Light Modern Bathroom Light Fixture with Seeded Glass Shade
- Grab Bar: Traditional Decorative ADA Grab Bar, 18-Inch, Champagne Bronze
- Shower Rod: 60″ Straight Shower Rod – Antique Brass
- Bathtub: 30-in x 60-in White Porcelain Enameled Steel Oval Alcove Soaking Bathtub
- Vanity Faucet less Handles: Cassidy Two Handle Widespread Bathroom Faucet Less Handles – Champagne Bronze
- Handles for Delta Faucet: Cassidy Metal Cross Handle Set Deck Mount Bathroom And Bidet – Champagne Bronze
- Towel Bars: Cassidy 24″ Towel Bar – Champagne Bronze
- Wall Paint: Sherwin Williams Alabaster White Paint
Gutting the Bathroom
As homeowners, we all know to expect the unexpected, and that bathroom remodel costs will probably be higher than first estimated. When gutting a bathroom, you'll know pretty quickly if you'll need to bring in a team of professionals, such as plumbers or a general contractor.
When the bathroom was gutted, we knew there might be wood rot under the tub and under the window. As the current tiles, vanity, tile, and tub were removed from the floor, we could see where there was termite and water damage long ago.
It was the right decision to gut the whole bathroom and start over.
Damage was not only under the tub but also up the wall where the shower window is located. It was such a mess until we felt the window could have collapsed one day.
Have you ever heard the saying, “if walls could talk?” Well, these walls did a little talking to us.
Under the drywall, we found a pencil that we assumed was our Dad's from working on the project and our other sister Pam wrote her name on the studs.
What great memories!
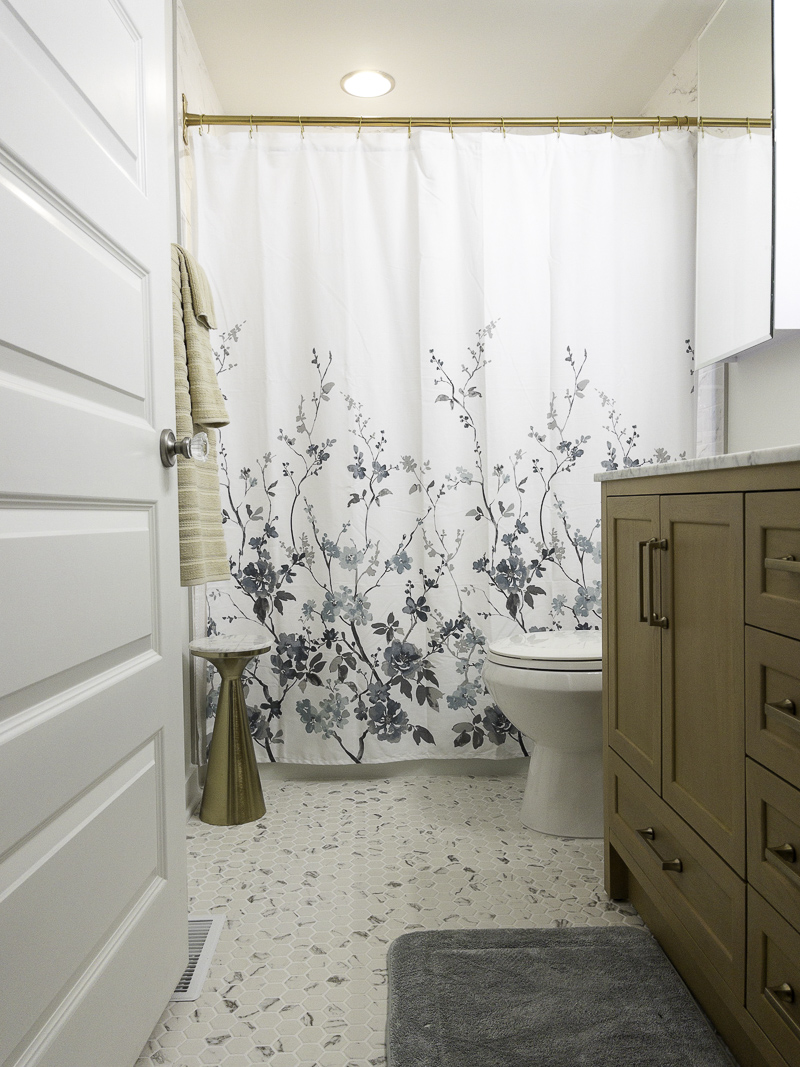
Now, let's travel through time to today. The bathroom is all finished, and I will give you a detailed tour of each piece along with a few stories through the construction process.
Sherwin Williams Alabaster
After all the walls were put back up, we decided to keep the interior paint color of the rest of the house for the walls – Sherwin Williams Alabaster.
This high LRV white color has a warm undertone. It is great for small spaces and this bathroom is on the smaller side.
I used this same paint color in a farmhouse bathroom renovation here if you want another example.
Bathroom Tile Floor
Let's start from the floor and move up beginning with the tile in this small bathroom remodel.
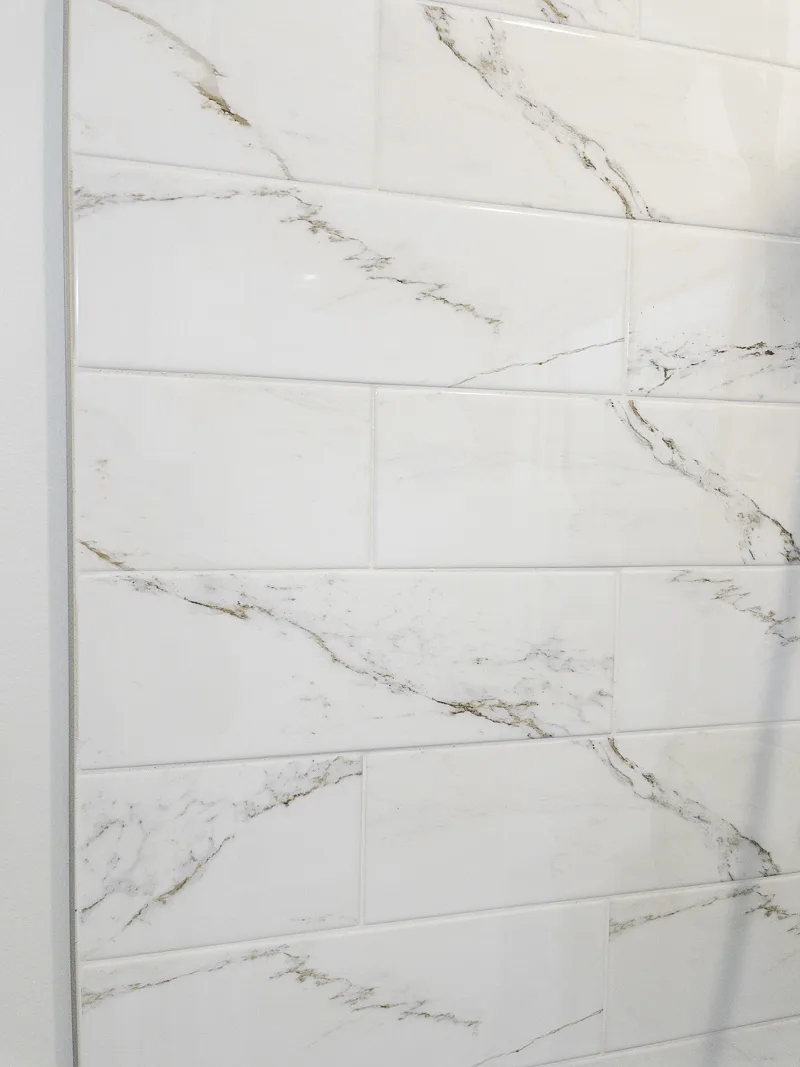
For the tile, I recommended a white marble tile in a rectangle shape, but the important thing about these tiles is gray and beige veining. This would make changing decorations easier because she loves to change her decorations.
Originally, I proposed a tiny beige tile inlaid into the design. Refer to the design plan above to see what I am talking about. But when she began shopping for just the right tile she ended up with this tile instead.

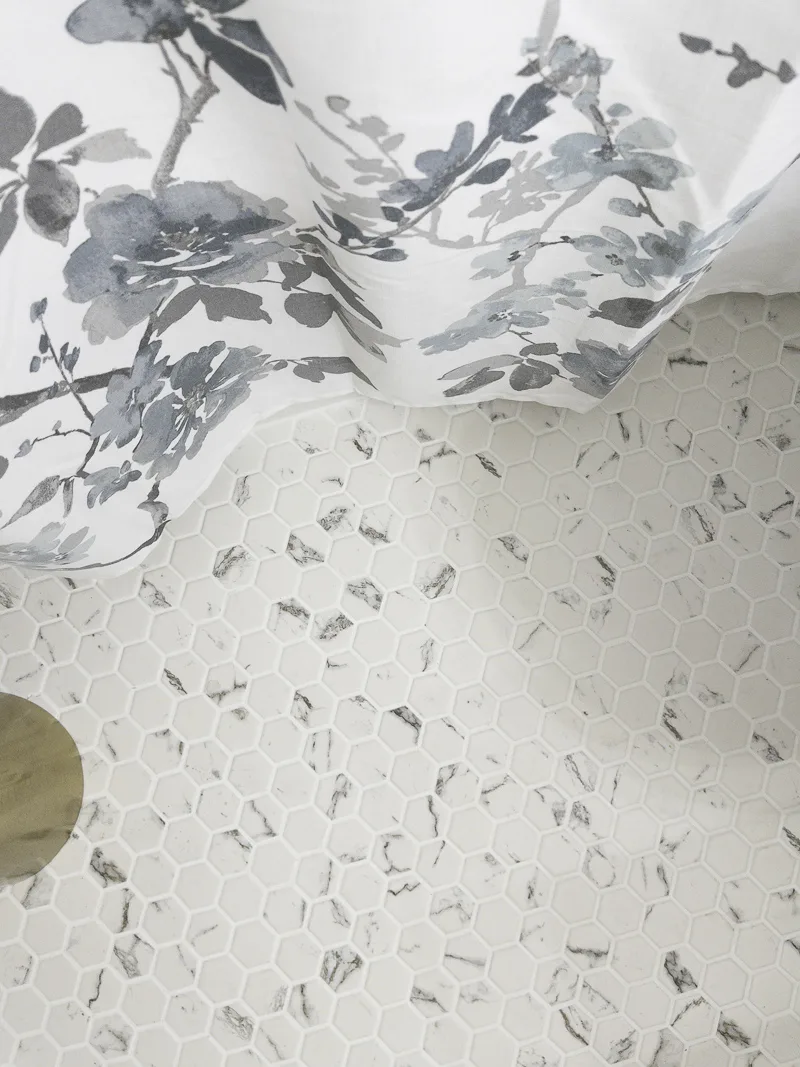
When she found this tile, she was very happy to see that it incorporated beige and gray veining, but after it was installed, she learned that the dye lot was different from the original she showed me.
This tile shows more gray than beige but she decided to keep moving forward on the project.
Installing the Tub
Next was the bathtub. Well, actually, the tub was put in first and then the floor tile, but humor me here. LOL!
When shopping for a tub, comfort was important. Here is a designer tip I love to share: When you shop for a tub, actually sit in it to test its comfort. You will thank me later, especially if you love taking baths.
After finding just the right tub, it was a little short for the space. To solve that issue, they added a small shelf at the end of the tub.
Now, she has more storage for shampoos and such.
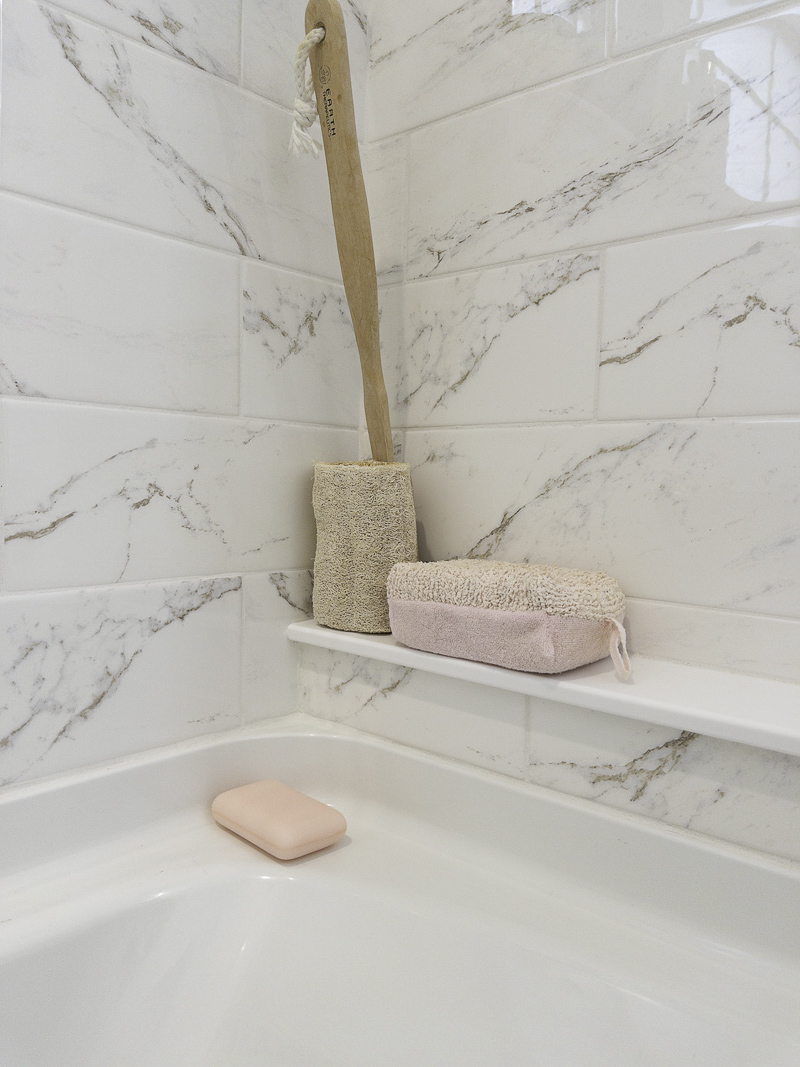

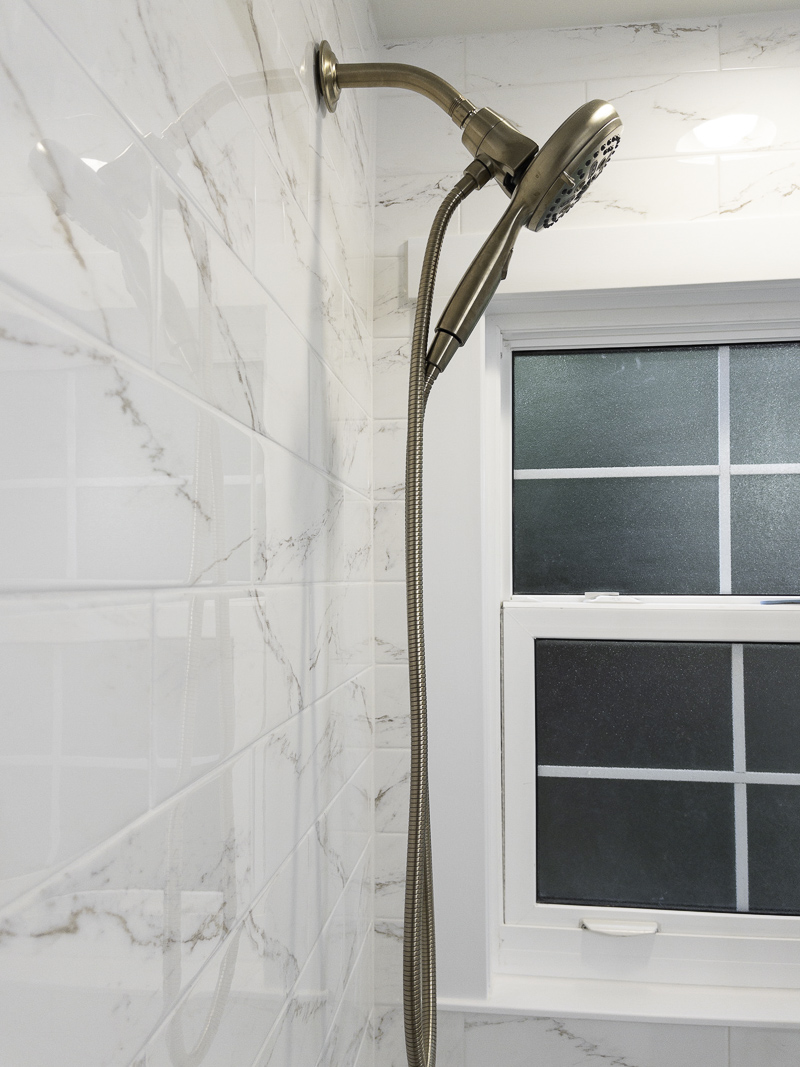
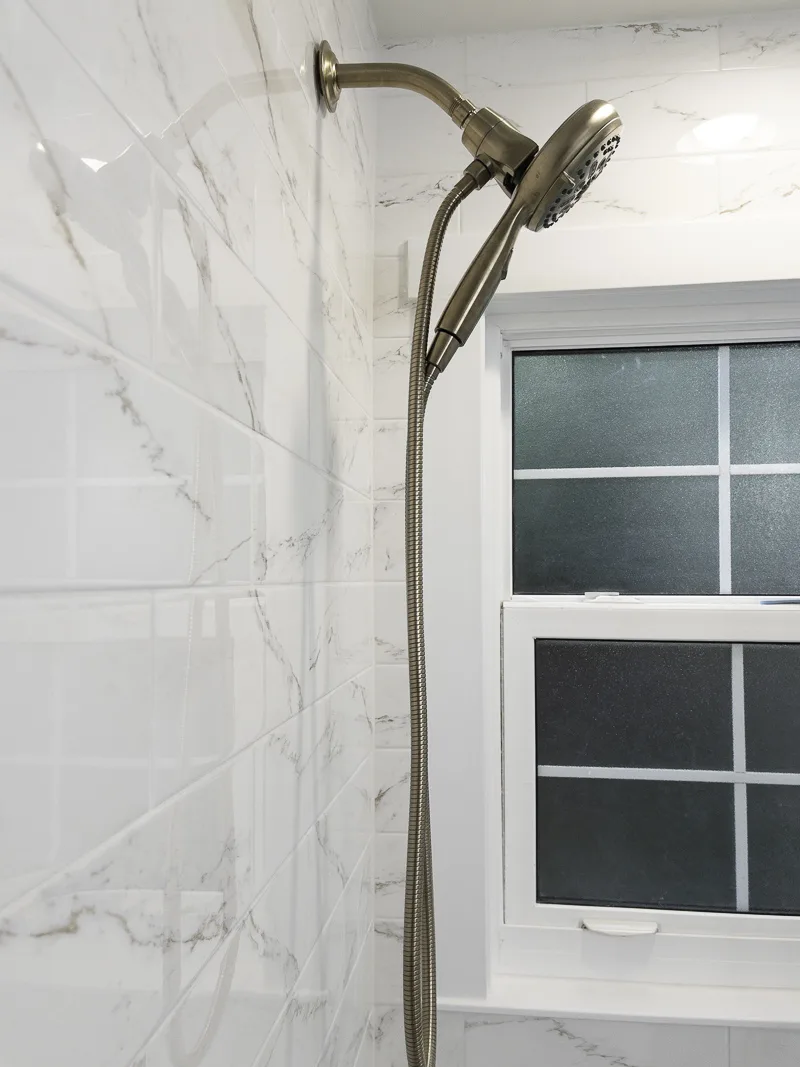
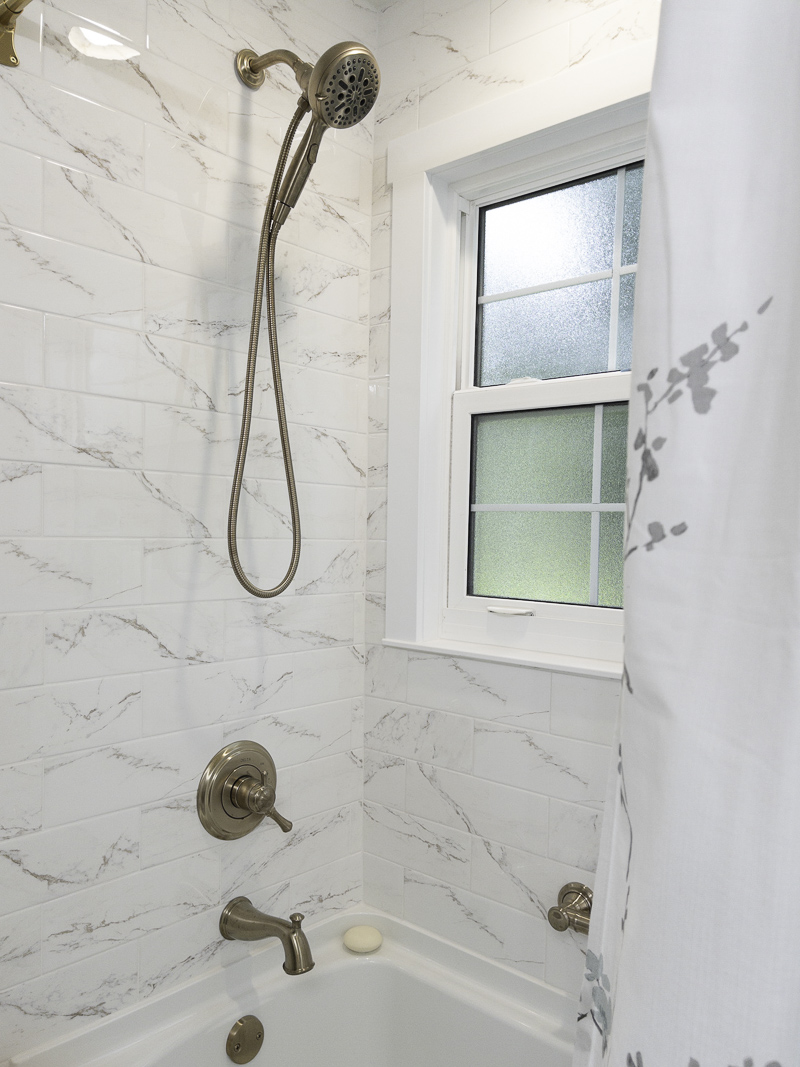
Shower Tile
Now, let's look at the tile on the walls. Like the floor tile, the plan was to do marble with warm and cool hue veining, but this time, a larger tile in a rectangle shape.
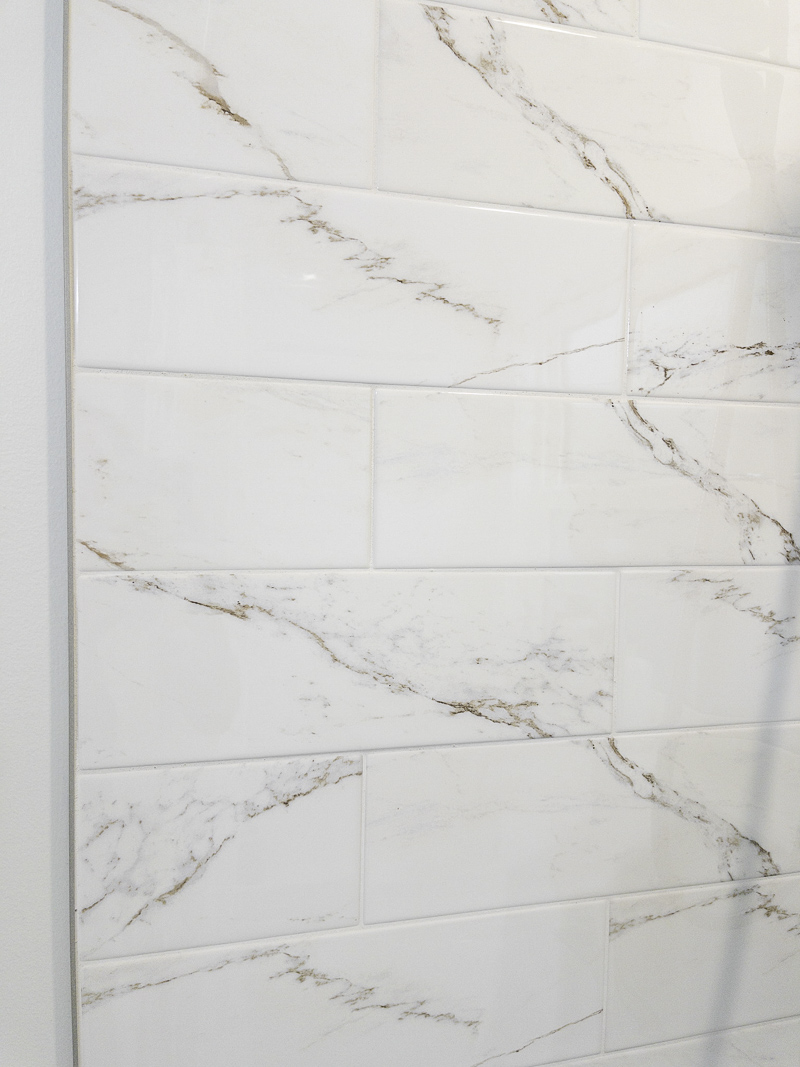
Another detail is the grout. For the shower tiles, the installer used a knife-edge grout line. Knife-edge grout lines are much easier to care for, as there is less to clean.
Corian Trim Around Window
When the bathroom was gutted, we already knew there would be extensive damage under the tub and possibly around the window. We spent a lot of time repairing wood damaged by water and termites.
When it was time to tile around the window, the contractor suggested using corian as trim. This would give a waterproof finish, and I thought this was a brilliant idea.
Bathroom Vanity
Next, let's hop over the vanity and discuss why we chose this one.
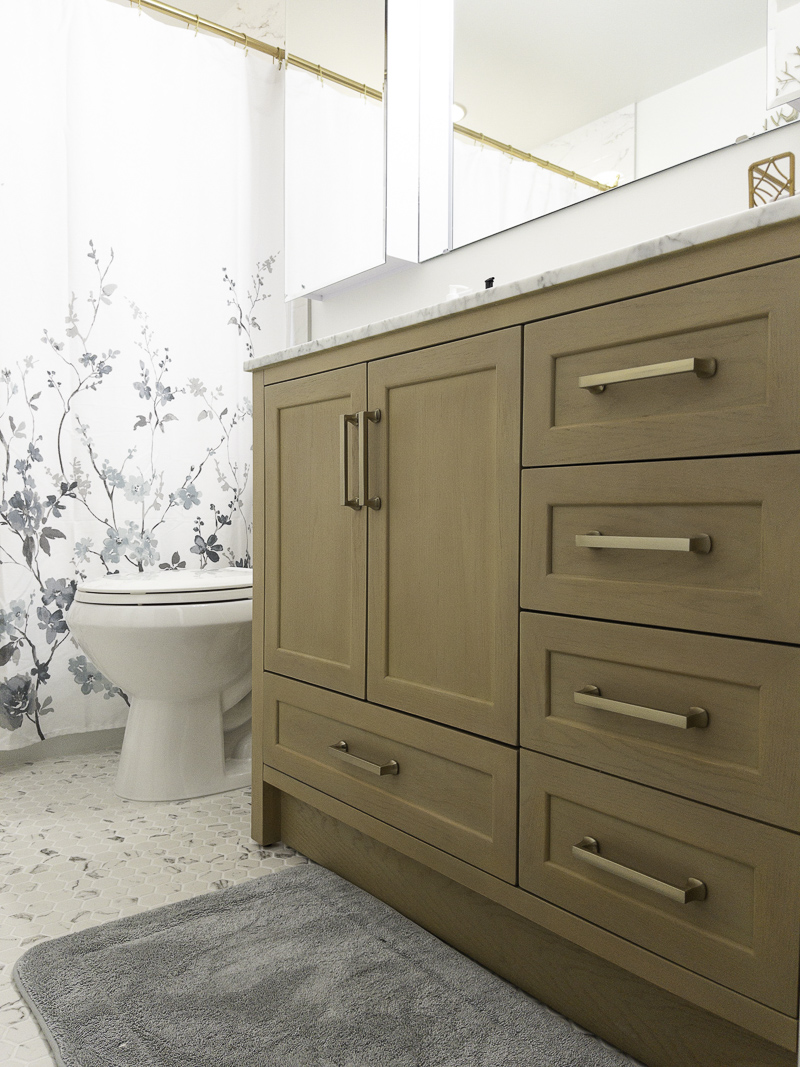

Several important elements were involved in this vanity for this bathroom.
First, we searched for light-colored wood to keep the feeling light and bright but anchor the design.
Second, storage is important in this bathroom, so we were looking for a vanity with drawers.
Drawers work better than cabinets when it comes to storage because cabinets have lots of wasted space in the top portion.
Third, we wanted white countertops to keep things light and bright. Since this cabinet checked off everything on her list, it was a keeper. We found it online at Bed, Bath, and Beyond.

Cabinet Hardware
The original vanity came with black pulls, but to keep the champagne bronze finish, we traded them for these pulls from Home Depot. They match and feel like luxury upgrades without adding much to the total cost.
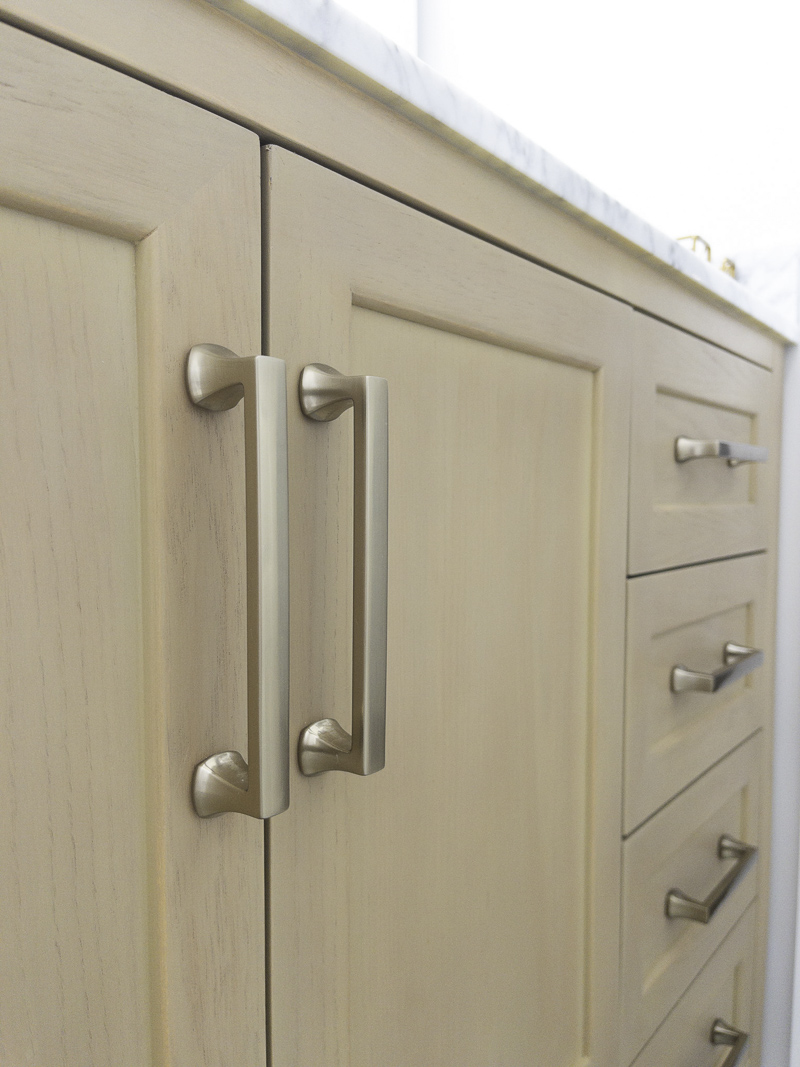
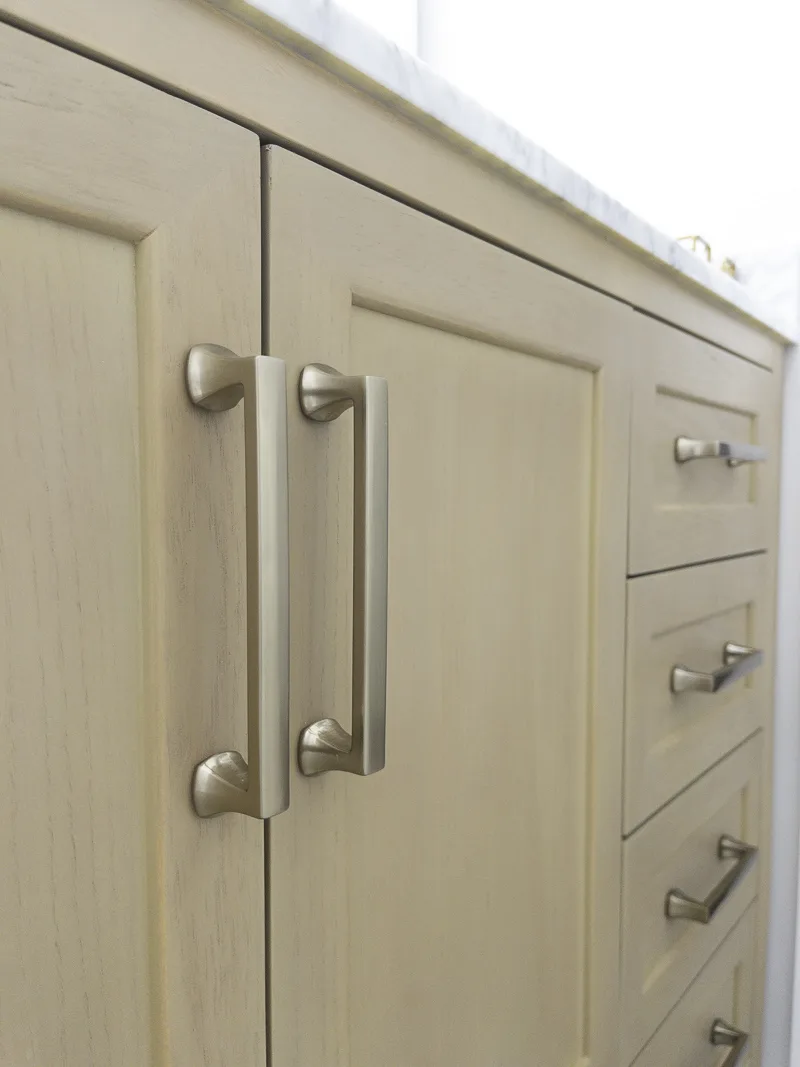
It is the little details that make a big difference.
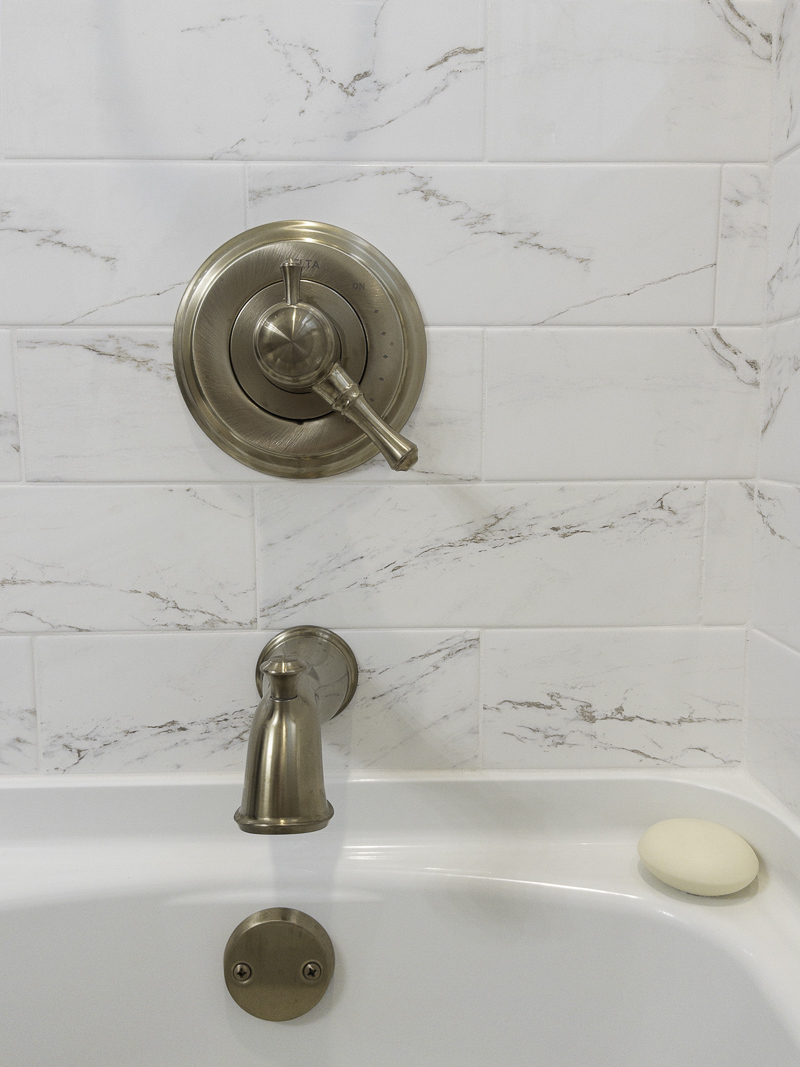
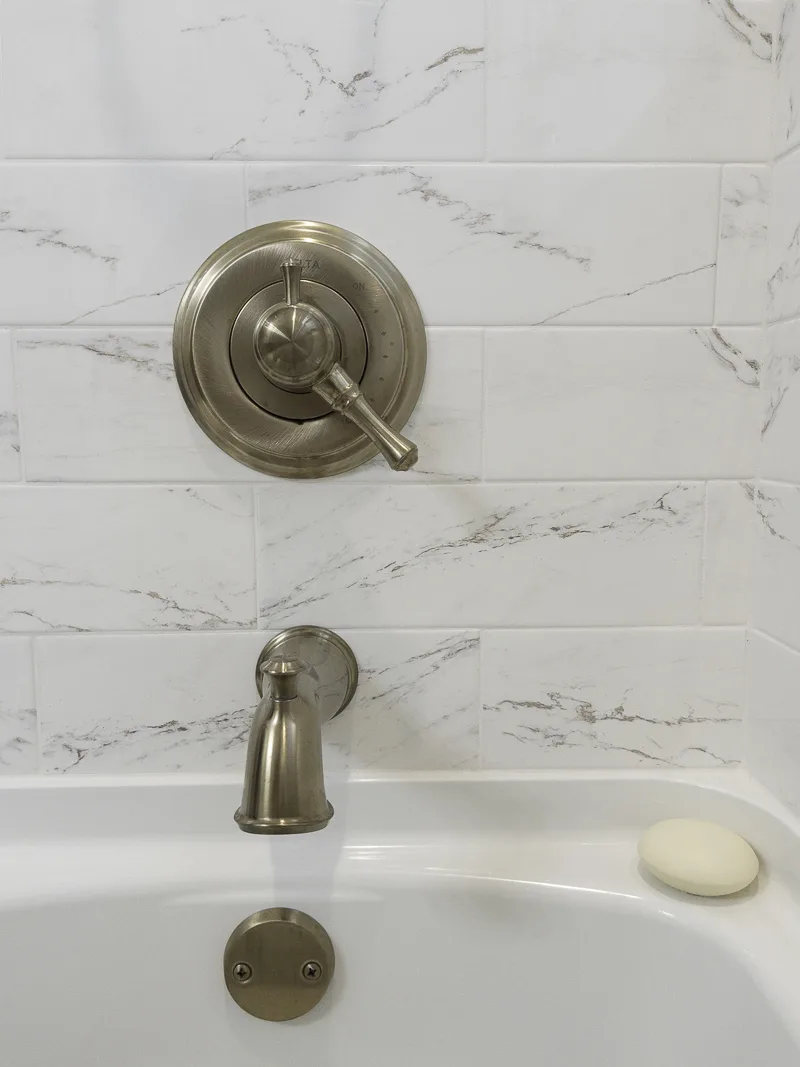
Bathroom Faucets
Next, let's talk about the faucets. For the vanity and showers, we decided on more champagne bronze, and Delta came to the rescue.

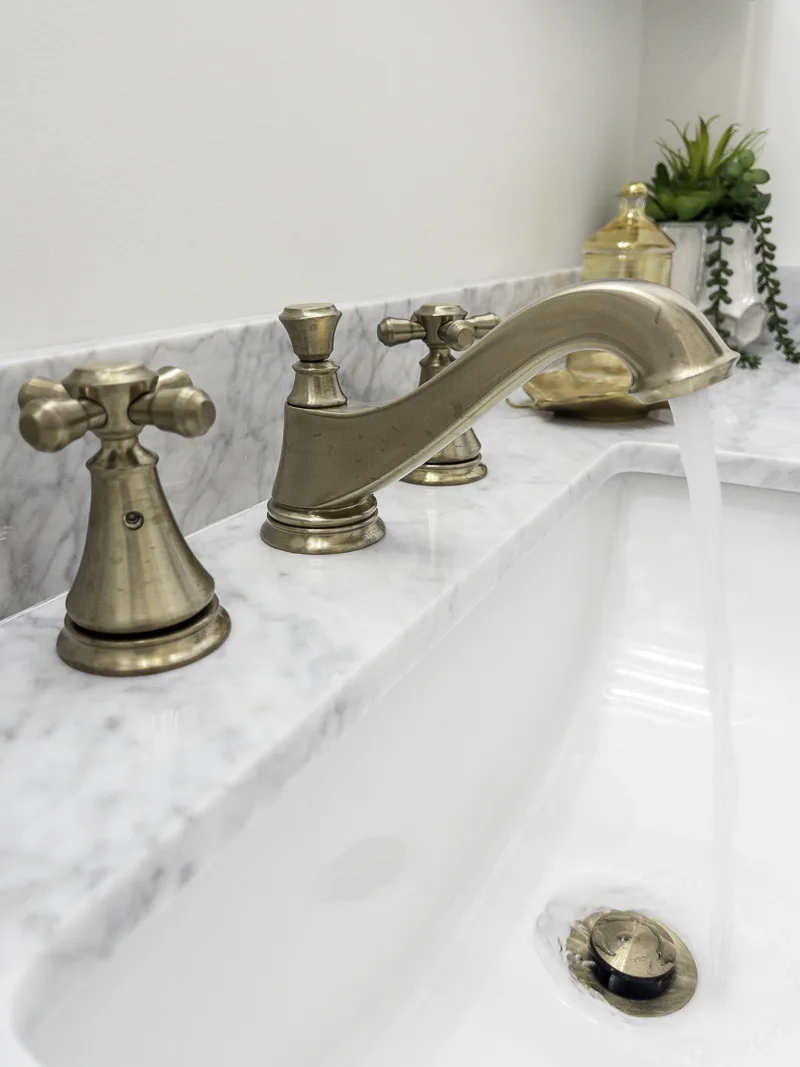
Not only did they have a beautiful faucet for the bathroom sink, but they also had a great option for the shower.

The handheld shower head is perfect for many things, such as cleaning the shower and bathing children and pets.
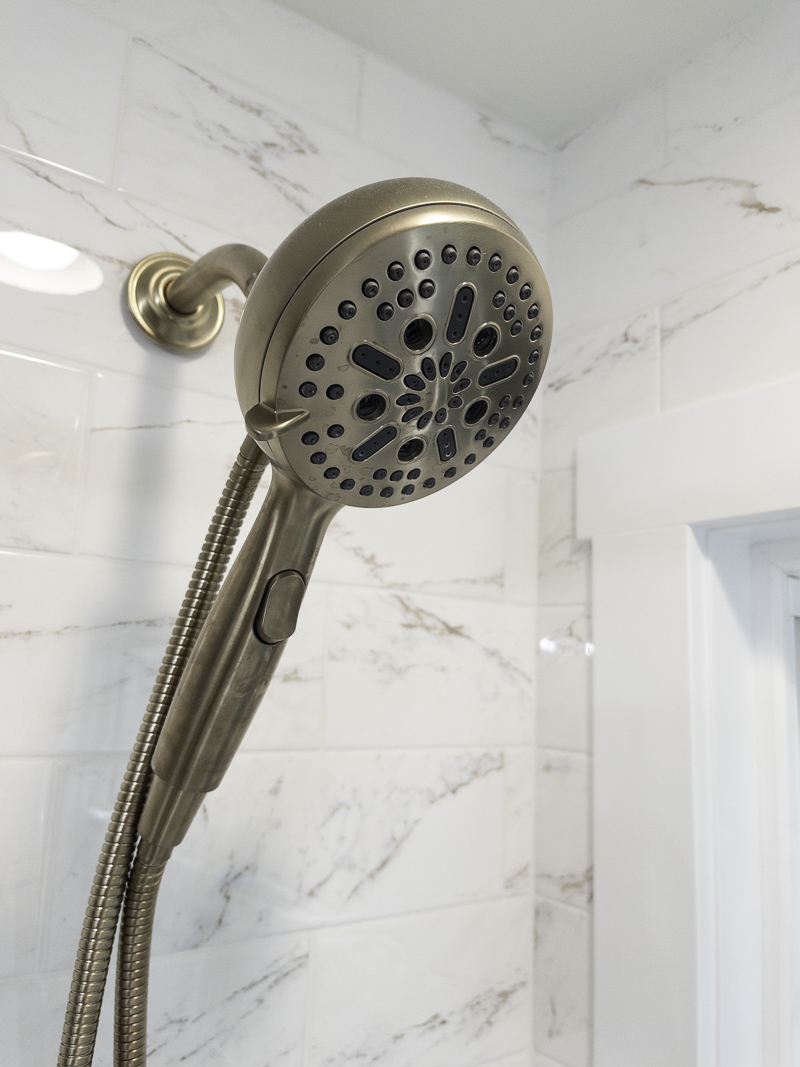
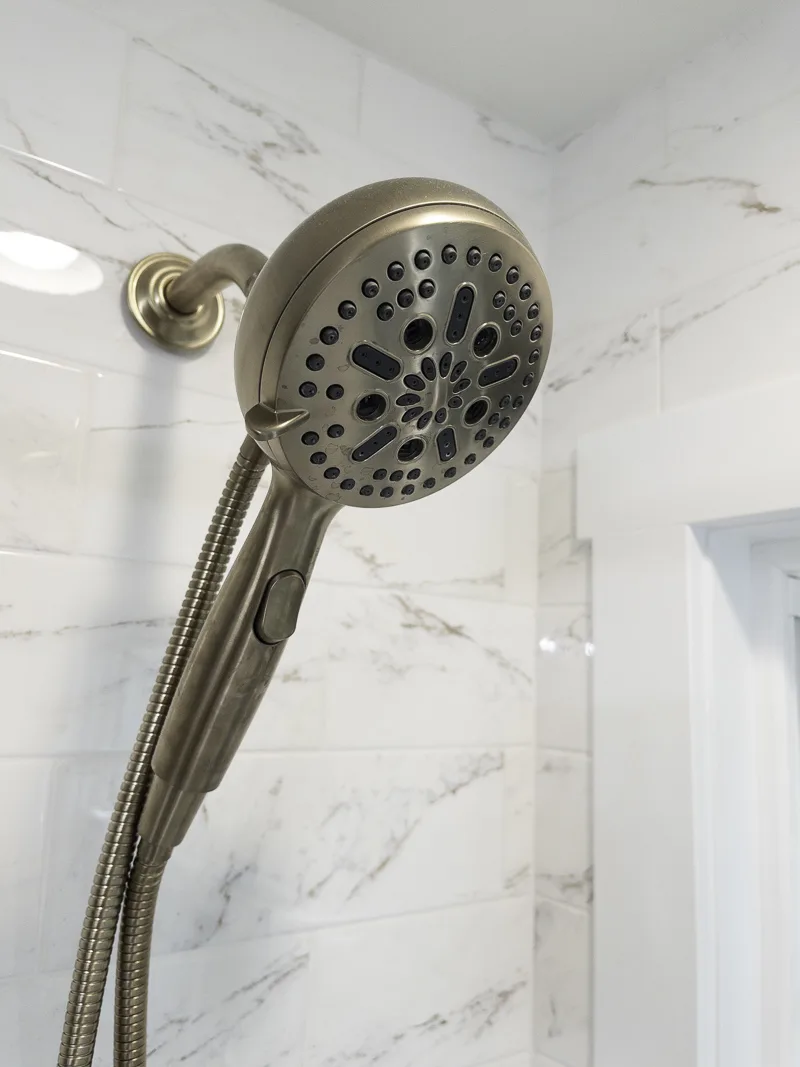
The single lever faucet handle is easy to use at any age.
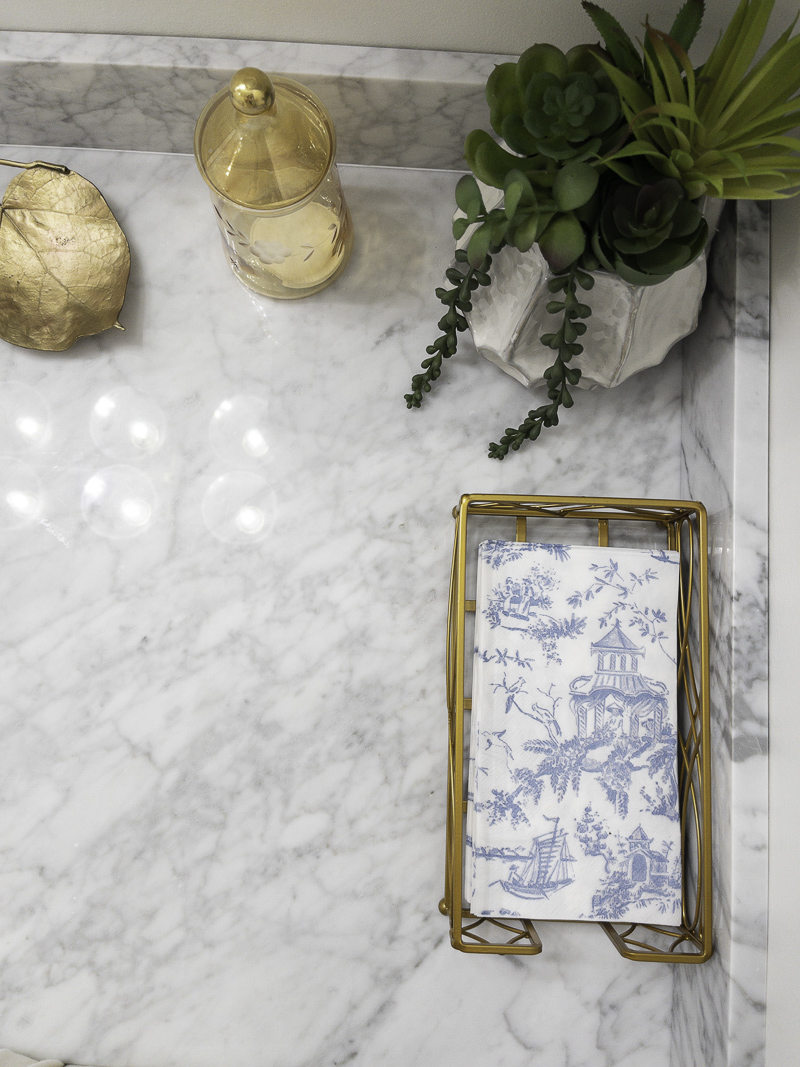
Bathroom Accessories
Now let's turn our attention to the other bathroom accessories like towel bars and such.

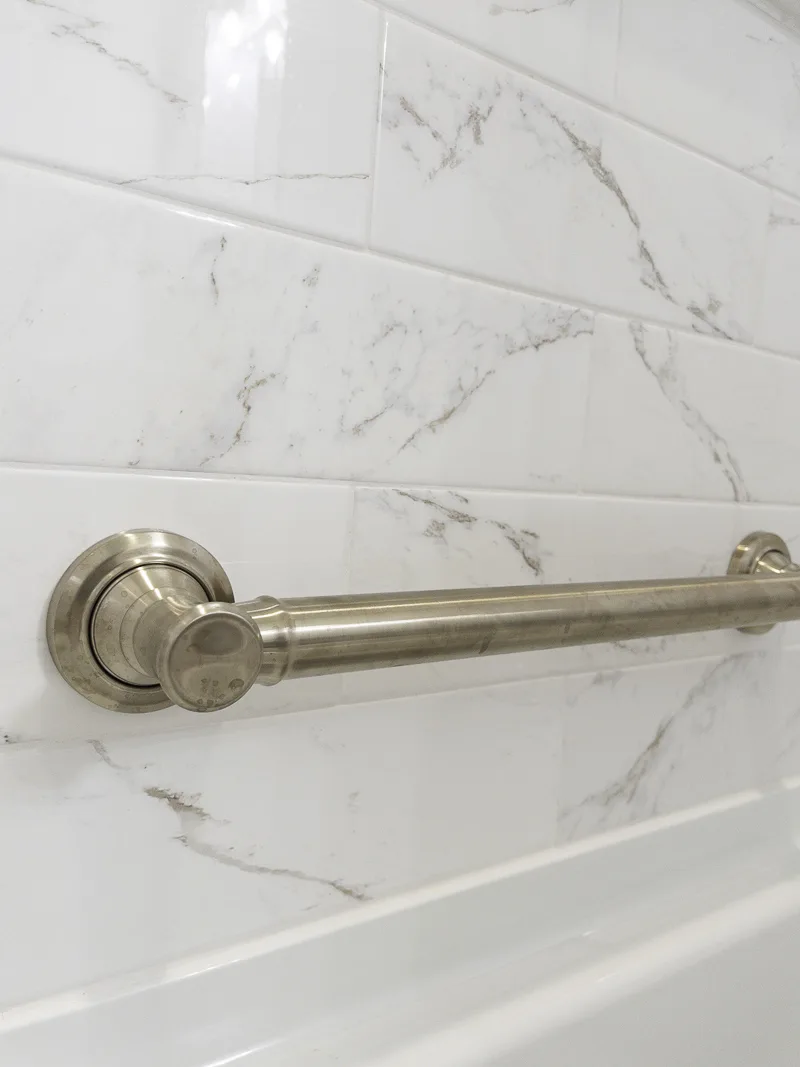
I love how they coordinated a handle for the tub. This is very convenient for anyone of any age, and it looks stylish.
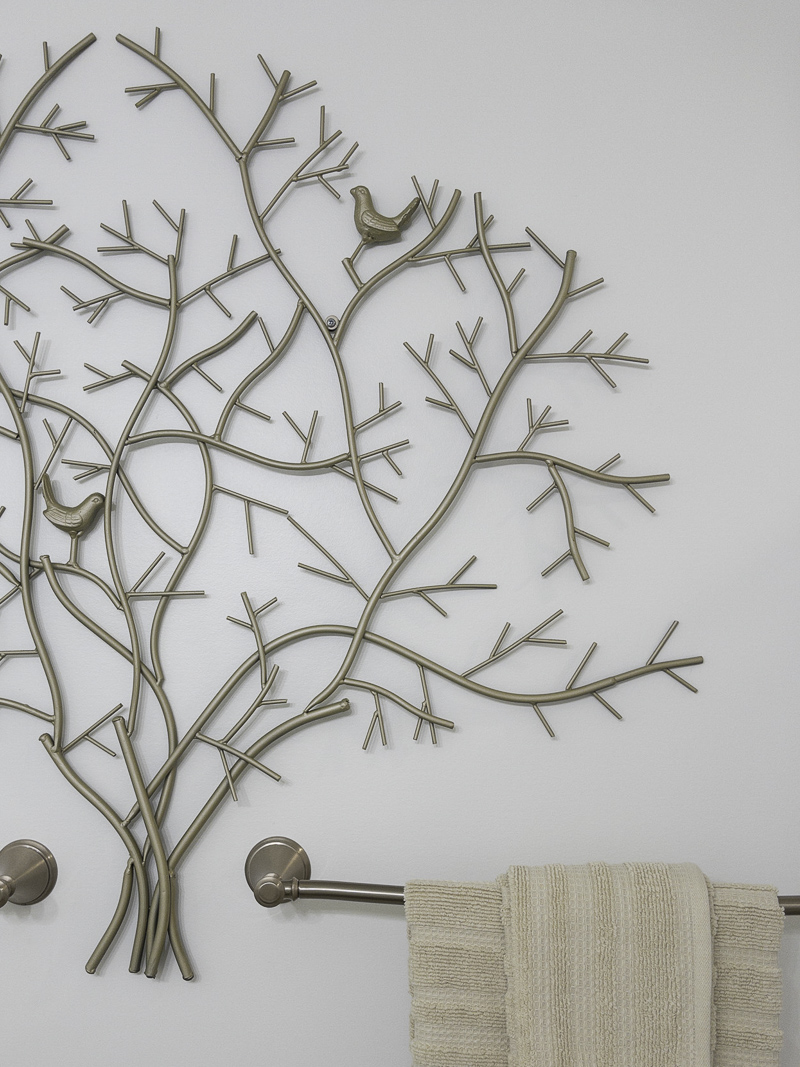
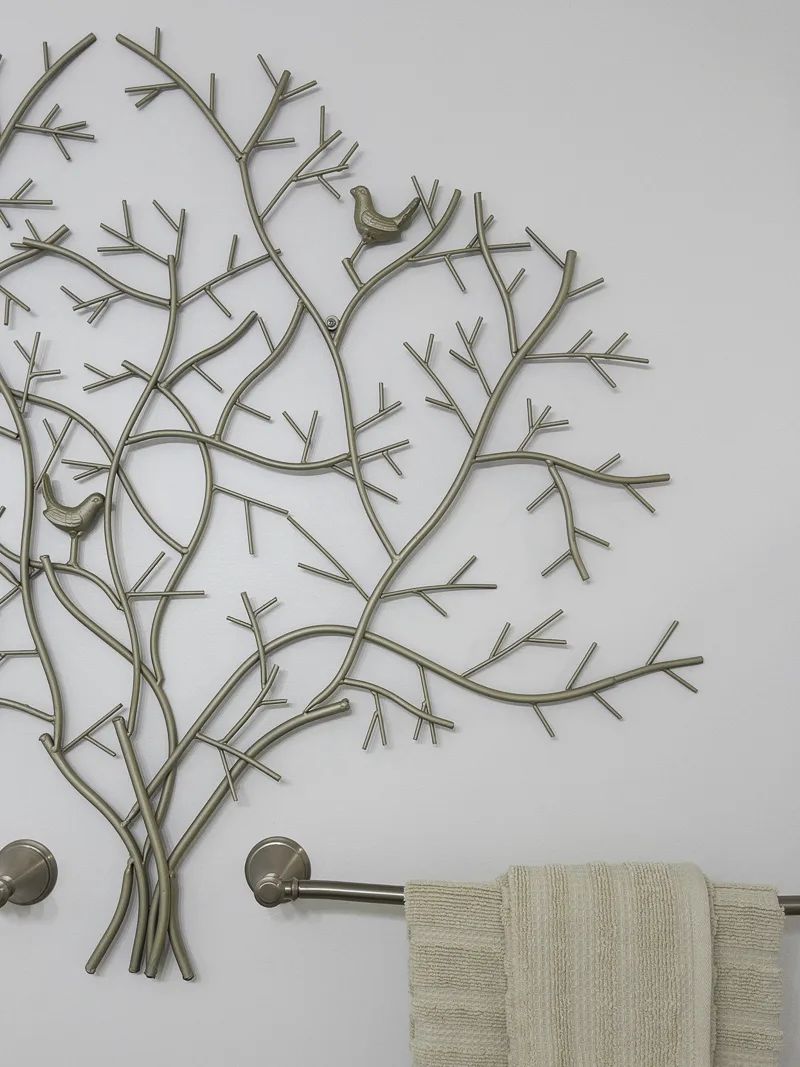
They also found matching towel bars in champagne bronze.
Now, if you are wondering about the artwork on the wall, it was in the old bathroom. My sister simply purchased spray paint in champagne bronze and gave it a new look.
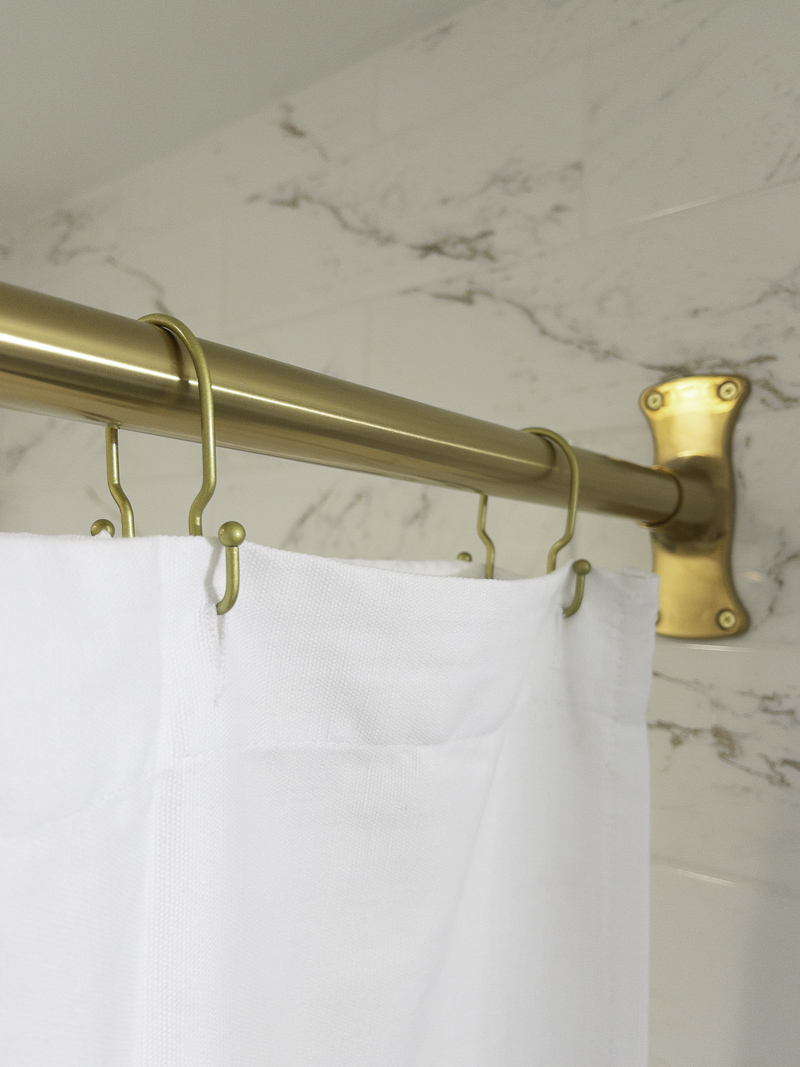

When it came to the shower curtain rod, things became more challenging. After looking and looking to no avail, she decided on this polished brass shower curtain rod.
Remember, mixing metals is okay, even if they are in the same family.
Bathroom Light Fixture
Keeping with the champagne bronze finish, this is the light they found for the bathroom.
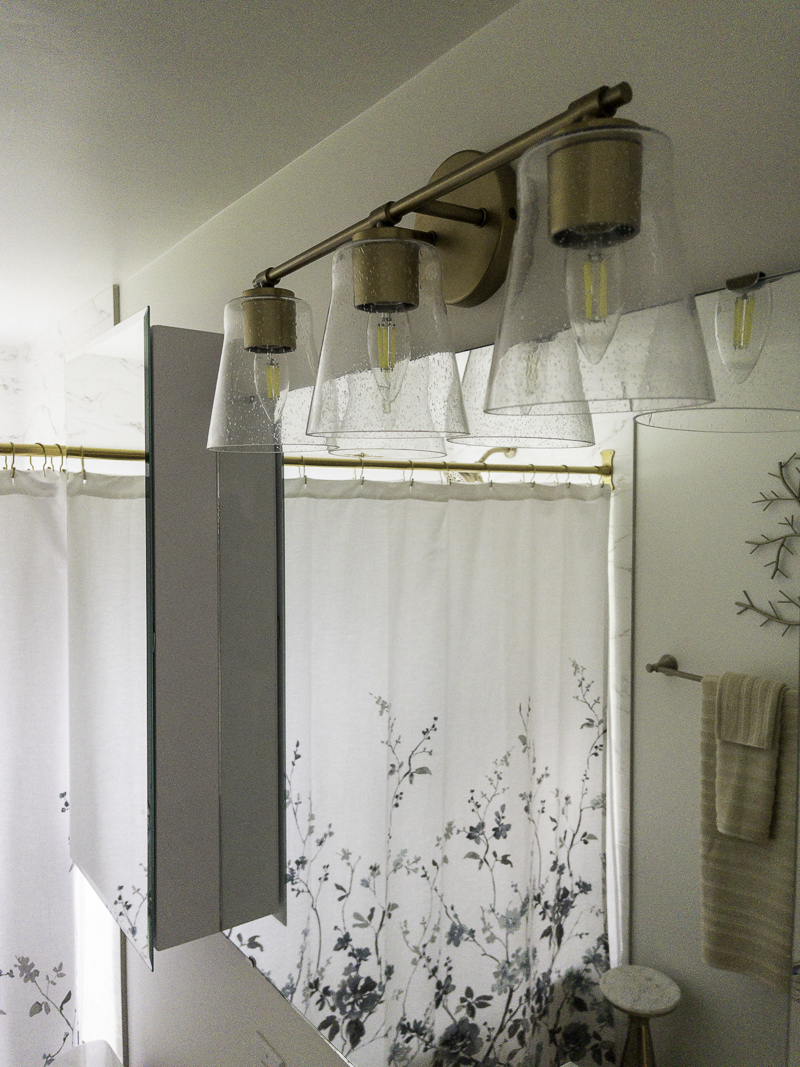

Good lighting is very important for this bathroom and this three-light fixture takes it to the next level. Not only do the design and color fit perfectly, but they also give off ample light for putting on makeup.
Mirrors & Medicine Cabinets
Remember me talking about how storage was important for this space? Well, my sister came up with the idea of placing two medicine cabinets on each side with a full mirror in the middle.
Refer to the photo above to see some of the mirrors. Tap on this YouTube video to see a full tour of the bathroom. You can truly see the mirrors and medicine cabinets in this video.
My sister plans to glue smaller mirrors on the inside sides of the medicine cabinets to give the mirror design a more seamless look. What a genius idea!
We have covered everything in this guest bathroom, so here are a few final thoughts to help you with your remodel project.
What is the Most Expensive Part of a Bathroom Remodel?
The most expensive parts of a bathroom remodel are the wet area, vanity, countertops, and tiles. You won't want to cut corners in these areas, especially the wet area. As you saw from our experience, waterproofing is essential.
Final Thoughts
When planning a bathroom renovation project, start by gathering ideas that consider the bathroom size. I like to use Pinterest to find inspiration and the latest trends.
Here is my Pinterest bathroom board which is a good place to start.
After you have gathered ideas, look at common elements such as colors and style. This will help you move to the next step: create a list of what you need to pick out and start selecting items for the bathroom of your dreams.
If you have a plan, you'll keep your overall cost down.
After selecting everything, find a way to print the images or place them on a document on the computer and look at them together. This will also help you estimate the cost of a bathroom remodel.
Then, you are ready to begin your bathroom remodel and feel proud when it's complete.
I hope you have found this blog post helpful and that it has inspired you to create your dream bathroom.
Here are other bathroom projects that may help you in your endeavors.
Happy Decorating!