
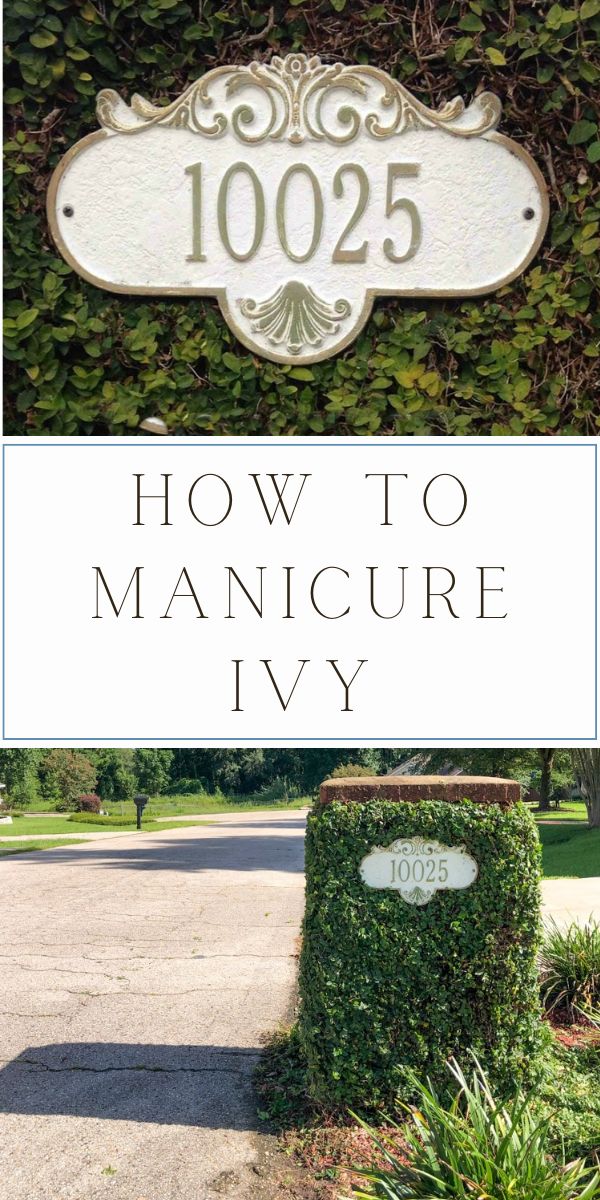
For over twenty years, one small brick mailbox has been the only yard project I've never quit, and I've mastered the art of manicured ivy.
I'm not a yard person, never have been, but there's something about a wall of neatly trimmed ivy that keeps me coming back to it every season, even here in Florida where everything wants to grow wild the second you turn your back.

If you want to know how to trim ivy so it looks like it belongs on an English cottage instead of a jungle, I'm sharing my exact method today, plus a clean-up trick that makes the whole job almost effortless.
How to Trim Ivy the Easy Way
Twenty years ago, I started with nothing but a pair of scissors and a lot of patience. It got the job done, but it took forever, and it never looked quite as crisp as I wanted.
Over the years, I found a faster way. Now I run a shrub edger parallel to the mailbox to get that clean, tailored line, and I only pull out the scissors for detail work.

It's the difference between a good trim and a truly manicured look, and Kit, our cat, usually supervises the whole thing from the porch step.
Tools You Need to Trim Ivy
You don't need a shed full of equipment to keep your ivy looking sharp. Here's what I reach for every time, and it's the same short list that makes learning how to trim ivy so much less intimidating.
- A shrub edger for that clean, straight line along the wall
- Pruning shears or garden scissors for detail work (I actually use kitchen scissors)
- A tarp to catch the cuttings
- A leaf blower for a fast clean up
Whatever you already have on hand is a fine place to start. You can always upgrade once you know how often you'll be trimming.
When to Trim Ivy for the Best Growth
You can trim ivy any time of year, but early spring is best for tackling excess growth, and mid spring works well for regular upkeep. Trimming during this window encourages fuller, healthier new growth right as the season kicks in.
By late summer, your ivy will likely be lush and ready for another light trim. Ivy grows fast, especially in our Florida heat, so don't be surprised if you're back out there sooner than you expect.
How to Trim Ivy Step by Step
Now that you have your tools and your timing figured out, here's exactly how I keep my mailbox ivy looking manicured, start to finish.
Step 1: Run the Shrub Edger Parallel to the Wall
Start by running your shrub edger parallel to the wall to trim back the bulk of the growth. I like to move in an upward motion, the same direction the ivy grew, since it's gentler on the vines.
Be careful not to cut too close to the wall. You want the greenery full and lush, just neatly nestled against the surface.
Step 2: Use Scissors for the Brick Edge and Numbers
This is where the scissors come in. I use mine to trim along the top brick edge of the mailbox so that a clean line stays visible, and around the house numbers so nothing grows over them.
Gently pull a loose vine out and snip it along the edge you're trying to follow. When you reach a corner or a number plate, angle your scissors at 45 degrees and miter toward the edge for a crisp finish.

Step 3: Clean Up, Two Easy Ways
Clean up is where a lot of people give up on ivy, but it doesn't have to be a chore. I use one of two methods.
The first is simple: lay a tarp down before you start trimming. When you're finished, gather up the tarp and drag the clippings straight to your compost pile or trash.
The second is my favorite hack if you have mulch beds around your ivy.
Lowe's sells a mulch glue spray that dries clear and locks your mulch in place. Spray it down ahead of time, and when you trim, the clippings just sit on top of the mulch instead of sinking in. Then you simply run your leaf blower over it and blow the cuttings away. It's such an easy trick, and it means you never have to pick through mulch by hand again.
Common Ivy Trimming Mistakes to Avoid
A few small missteps can undo all that hard work, so keep these in mind as you go.
Cutting too close to the wall. This leaves bare, patchy spots that take a season or more to fill back in.
Trimming during nesting season. Ivy is a favorite shelter for birds in spring. The Royal Horticultural Society recommends checking for nests before a heavy trim, and holding off if you spot one.
Using dull blades. Dull shears tear the vine instead of cutting it clean, which can leave your ivy looking ragged and stressed.
Skipping the edge work. A power trim alone won't give you that manicured look. The scissor detailing around edges and numbers is what makes the difference.
How to Keep Ivy Looking Manicured Year-Round
A little maintenance spread across the seasons goes a long way. In spring, give your ivy its biggest trim of the year to shape new growth. In summer, do a quick touch-up with scissors around any high-traffic areas, like house numbers or door frames.
In fall, cut back any stems reaching toward the roofline or windows before winter weather sets in. Winter is your ivy's rest period, so this is a good time to simply enjoy how full and green it looks against a bare landscape.
Thinking About Planting Ivy? What to Know First
If you don't have ivy yet and you're drawn to that English cottage look, a little planning up front will save you headaches later.
There are quite a few varieties to choose from, including English ivy, creeping fig, Algerian ivy, Boston ivy, Persian ivy, and Irish ivy. Each one has a different leaf size and shape, so it's worth doing a little homework before you plant.
I chose creeping fig for my mailbox because the leaves are small and petite. It clings tight to brick and can be trimmed very close to the wall, which is exactly what I wanted for that manicured look.
Start small if you can. I chose my brick mailbox because it gave me a contained space to work with, and that made it so much easier to keep under control.
Before you plant, check with your local nursery to make sure your ivy of choice is safe for the surface you have in mind. I worked with Tallahassee Nurseries when I picked plants for our screened-in porch, and their advice made all the difference.
Frequently Asked Questions About Trimming Ivy
What do I need to trim ivy on my house?
A shrub edger or hedge trimmer for the bulk of the growth, plus pruning shears, garden scissors, or kitchen scissors for detail work. A tarp and a leaf blower make clean up quick.
When should I trim my ivy?
Early spring is best for cutting back excess growth, and mid spring works well for regular upkeep. You can do light touch-ups any time of year.
How fast does ivy grow?
Ivy is a fast grower. Some varieties, like English ivy, can grow five to seven feet in a single year, so don't be surprised if you need to trim more than once a season.
Is it bad to trim ivy off a wall?
Light, regular trims are good for your ivy and your wall. Just avoid cutting so close that you damage the vine's grip, and check for nesting birds before a heavy trim in spring.
What is the best tool for trimming ivy?
For the bulk of the growth, a shrub edger or hedge trimmer run parallel to the wall gives the cleanest line. For detail work around edges and numbers, sharp scissors or pruning shears are hard to beat.
More DIY Garden Ideas You'll Love
Once your ivy is looking sharp, you might enjoy trying your hand at container gardening too. I have a couple of posts and a video that walk through the whole process.
- Container Flower Gardening for Beginners: Planting Plan
- Container Flower Gardening for Beginners: Planting Plants
- Container Gardening: How to Plant Flowers in Pots
Conclusion
I don't have a green thumb, and I have no training in landscaping. If I can keep this ivy looking manicured for twenty years, I promise you can too.
If you have mulch beds nearby, do yourself a favor and try that mulch glue spray trick. It's genuinely one of my favorite yard hacks, and it makes clean up almost effortless.
Do you have ivy growing on your home or mailbox? I'd love to hear how you keep yours trimmed, and see your before and after photos. I hope your ivy turns out beautiful, and I hope you have a great day!
Happy Decorating!

If you enjoyed these ideas, please sign up for emails, so you don’t miss out on more fun decorating tips and ideas HERE
Thanks for this tutorial! Do you use the Ryobi hedge trimmers or the garden sheers to make the edge around the top of the brick? I have the fig ivy on the wall of my house and I want a quick way to keep it from climbing over the edge. I’m afraid it’ll have to be garden sheets which feels like more work. ???? thanks!
I use the Ryobi hedge trimmer.