
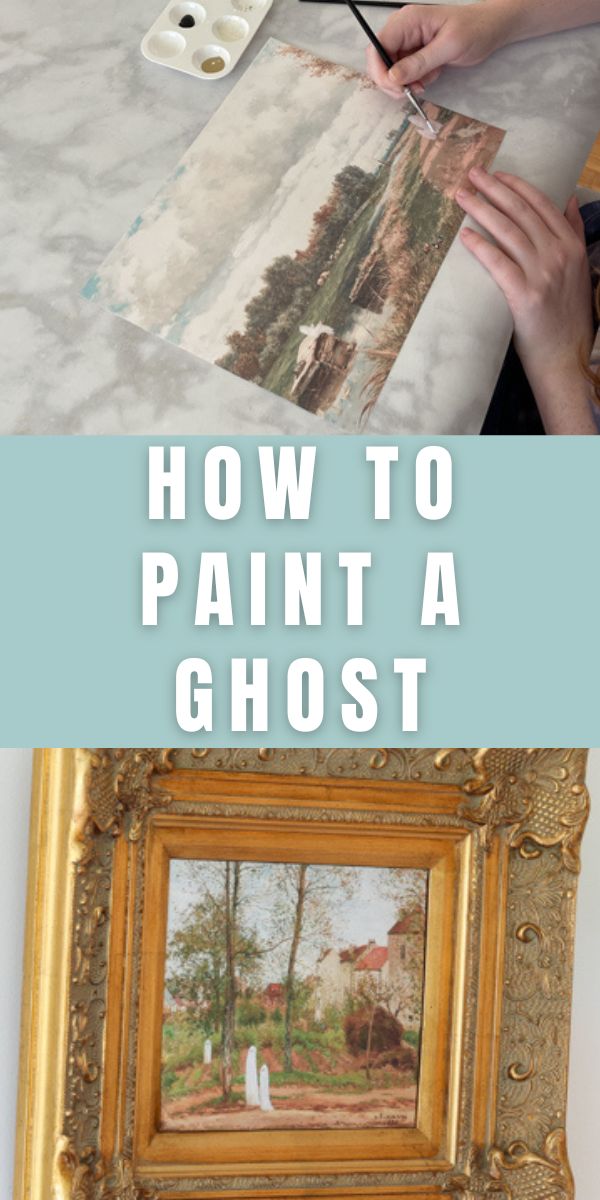
If you've been looking for a Halloween project that's equal parts spooky and charming, this DIY ghost painting is it. All you need is a thrift store painting or a vintage print, a little white paint, and about 30 minutes. The result looks like something you'd find in a boutique shop — but you made it yourself for just a few dollars.
Hannah and I are walking you through every step so you can do this too, even if you've never painted a thing in your life.

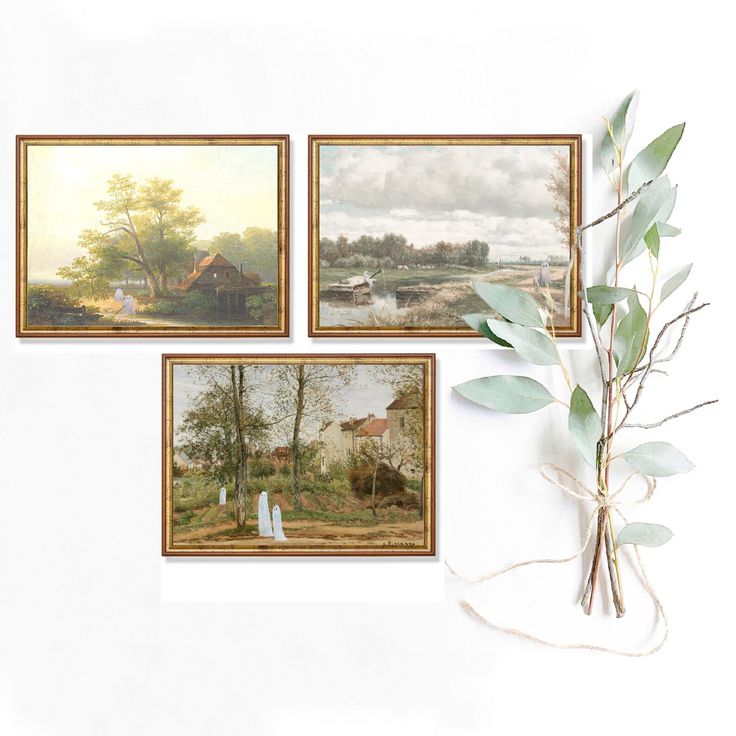
After jumping on the Tiktok challenge, Hannah painted ghosts on one of our Etsy museum prints, and we thought you might like some pointers on how to paint a ghost along with decorating ideas.
How to Do a DIY Ghost Painting on a Thrift Store Print
Hannah has years of experience painting, so she was just the right person to walk us through how to paint a ghost. We printed and used one of our printables in our Etsy shop for this project. You can shop here for all the vintage prints or hunt at your local thrift store.
Speaking of thrift stores, have you tried playing thrift bingo? This would be a fun thing to do with friends, too.
I think the printable is the easiest way. You're about to give it a whole new look. You'll also be able to watch the process on our YouTube video.
Why This DIY Ghost Painting Works So Well
This diy ghost painting trend started on TikTok, and honestly, it makes perfect sense. Old landscape paintings — the kind you find at the thrift store for two dollars — already have the perfect moody atmosphere for a ghost or two.
Rolling hills, foggy roads, quiet ponds. All you're doing is adding the characters that were always meant to be there.
The beauty of this project is that you don't need to be an artist. If you can hold a paintbrush and follow a few basic steps, you can do this. And if you'd rather skip the painting altogether, keep reading because I have an easier option for you at the end.
Looking for more Halloween decorating ideas? Check out my Halloween Printable Decor Ideas for more inspiration.
Now let's start by collecting supplies and giving you step-by-step instructions.
What You Need for a DIY Ghost Painting
What Supplies Do I Need to Paint a Ghost on a Thrifted Painting?
- Black and white paint
- Paint brushes and possibly a fine-tip black pen
- Paint tray
- A cup of water to clean the brush
- Paper towels and something to protect your work surface
- Vintage print or printable from Etsy
- Hard coat Mod Podge decoupage to finish print
What are the Steps to Paint a Ghost on Vintage Painting?
- Begin by determining the placement of ghosts
- Paint the bottom layer of the ghost
- Paint the top layer of the ghost
- Add shadows and eyes to the ghost
- Brush on decoupage
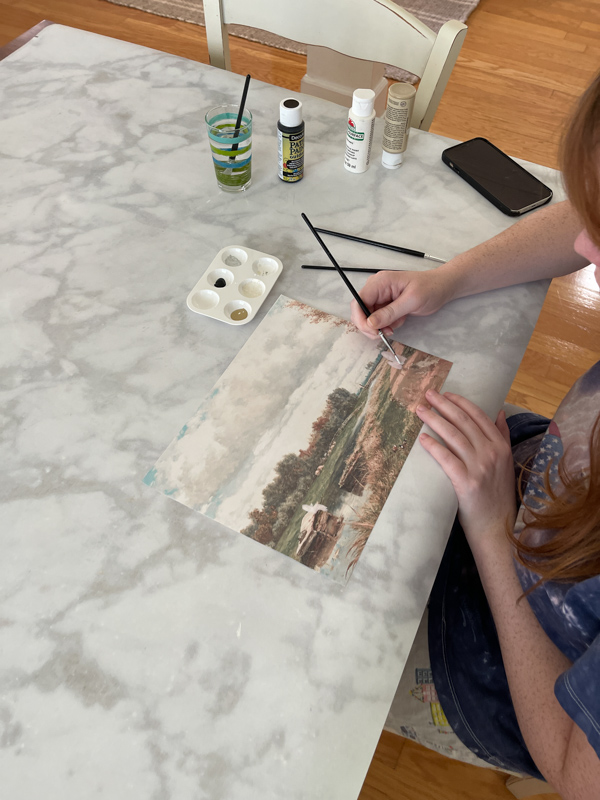
Step 1: Determine Placement of Ghost on Art
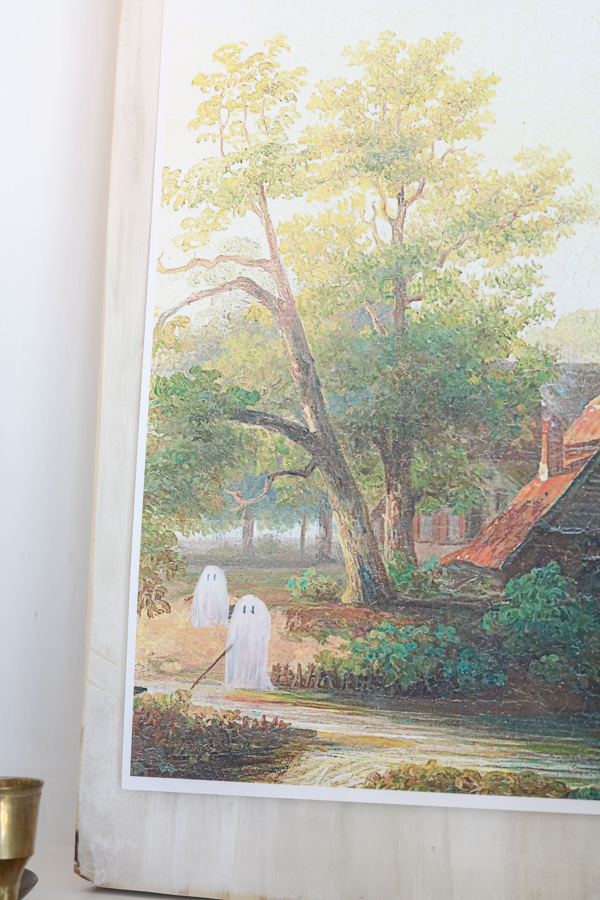
For your first step, look at the landscape of your painting and think about natural places people would be standing, walking, or sitting. You can have a lot of fun here by thinking through funny places for your ghosts to reside.
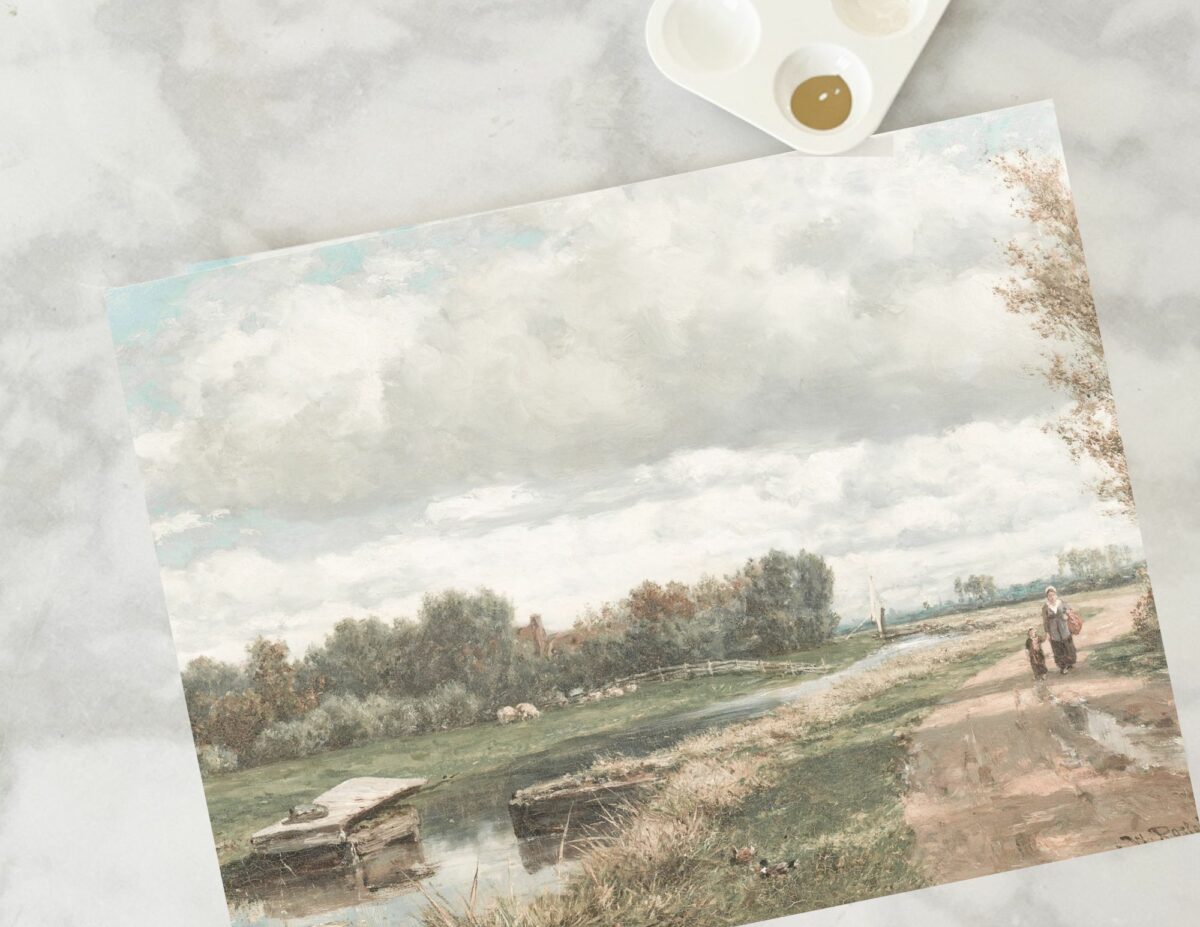
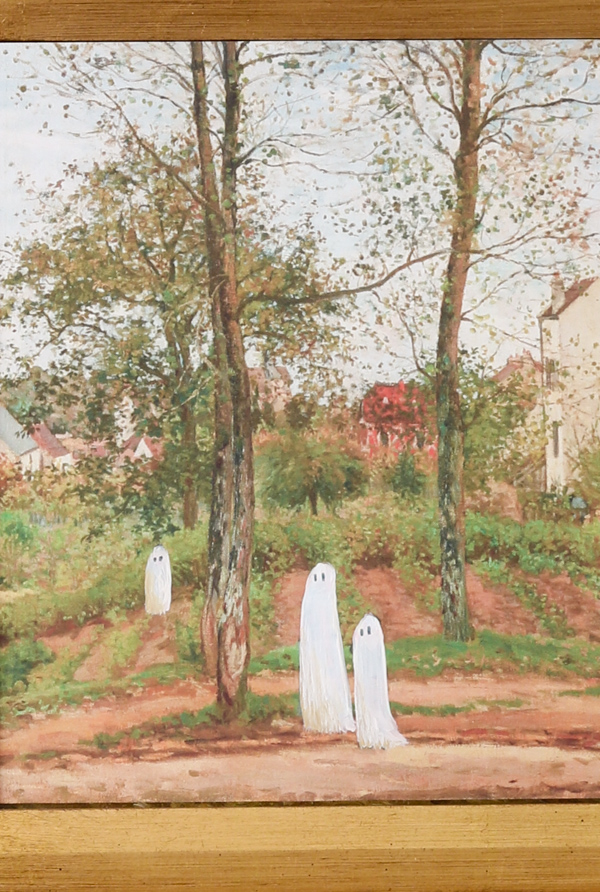
On our vintage print, we decided to cover the people walking down the dirt road and add another ghost enjoying fishing from the doc. The little details make this a fun painting when you are done.
Step 2: Paint Bottom Layer of Ghost
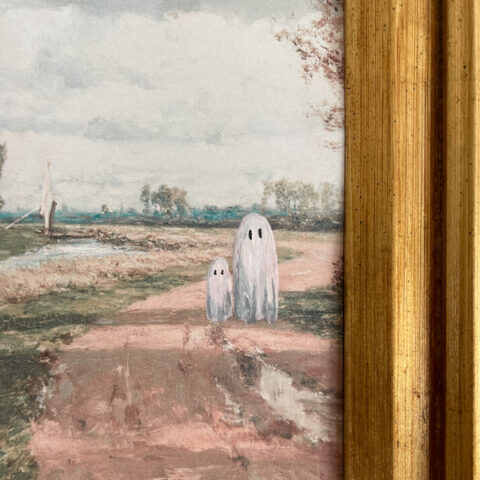
When painting, think in layers. Begin with the bottom layer. White will be the base color, but to give it a vintage look, Hannah mixed a speck of black into the white and painted right over the people, creating the ghost shape by following the round shape of their heads and brushing in long strokes to the ground.
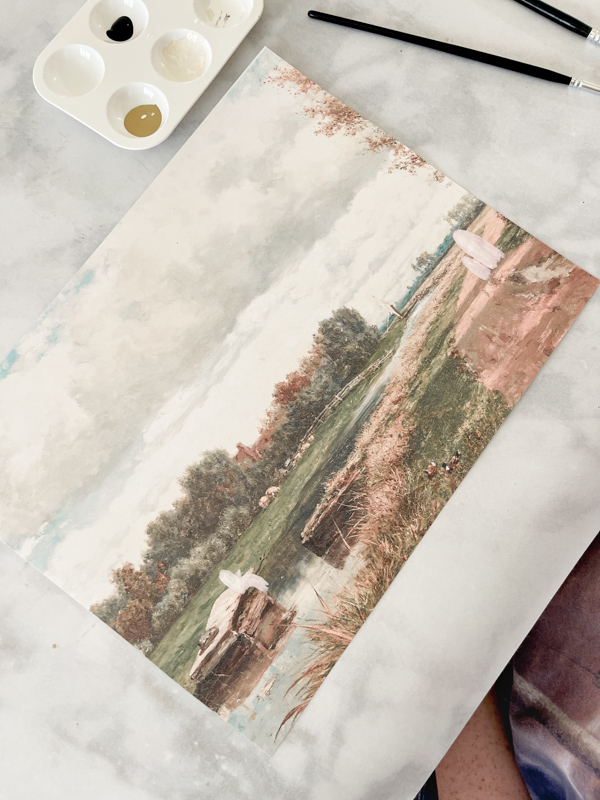
This thin layer is just the start. If you look closely, they are see-through at this point.
Step 3: Paint Top Layer to Ghost
Next, let that first coat of paint dry; you can use a blow dryer on a cool setting and then go over the ghost with another layer of paint.
It will look like this at this point. Here is a tip. When making those long brush strokes, leave them a little unfinished and scraggly at the bottom. This will give the ghost a floating appearance and be more realistic.
Pro Tip: If you want your ghost to look more antique and less bright white, mix a tiny drop of raw umber or burnt sienna into your white paint. This gives the ghost a warm, aged look that blends beautifully with vintage and sepia-toned prints.
Step 4: Paint Shadows and Eyes to Ghost
Next, let's add some shadows and eyes to the ghosts.
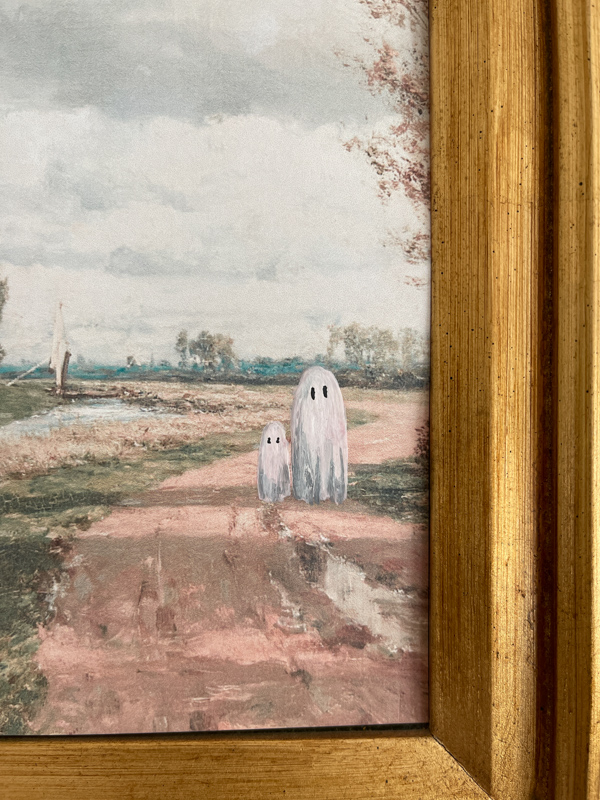
Use the same technique, but add another black dot to the white to get a gray color. Then think about the folds of the ghost's sheet or skirt and paint the gray mix of paint within the creases. The slightly dark paint gives the ghost depth and realism.
It also helps to look at the sun's direction in the original painting. If the sun comes in from the right, the ghost will have more shadow on his left side.
Pro Tip: Not confident about painting eyes freehand? A fine-tip black Sharpie works beautifully for the eyes and any small details. Let your paint layer dry completely first so the marker doesn't bleed.
Last, take a fine-tip paintbrush or use a fine-tip black pen, and add the eyes.
If your ghost is doing something like fishing, add his fishing pole and line into the water.

LOL! I love this ghost! It's like he grabbed a stick to go fishing. Wonder if there are ghostfish in that pond. Haha!
Step 5: Brush on Decoupage
Now that we have everything painted, consider adding some hard-coat decoupage following the original strokes of the original artist, especially if you printed one of our prints. This will give your print a realistic oil painting look.
Now let's talk about ways you can decorate with your ghost painting.
Common Mistakes to Avoid with Your DIY Ghost Painting
Even a simple project like this has a few places where things can go sideways. Here's what to watch out for.
Skipping the layering step. One coat of white paint almost never gives you a solid ghost. It will look transparent and unfinished. Let each layer dry before adding the next.
Making the ghost too perfect. A ghost should look slightly wispy and imperfect. If your edges are too clean, soften them with a dry brush while the paint is still slightly wet.
Using the wrong size brush. A large flat brush is great for the body, but you need a small round brush for the head shape and a fine detail brush for the eyes and shadows. Having all three on hand makes a big difference.
Forgetting to seal it. Mod Podge hard coat is the finishing step that protects your painting and gives it a realistic painted look. Don't skip it.
Decorating with Ghost Painting
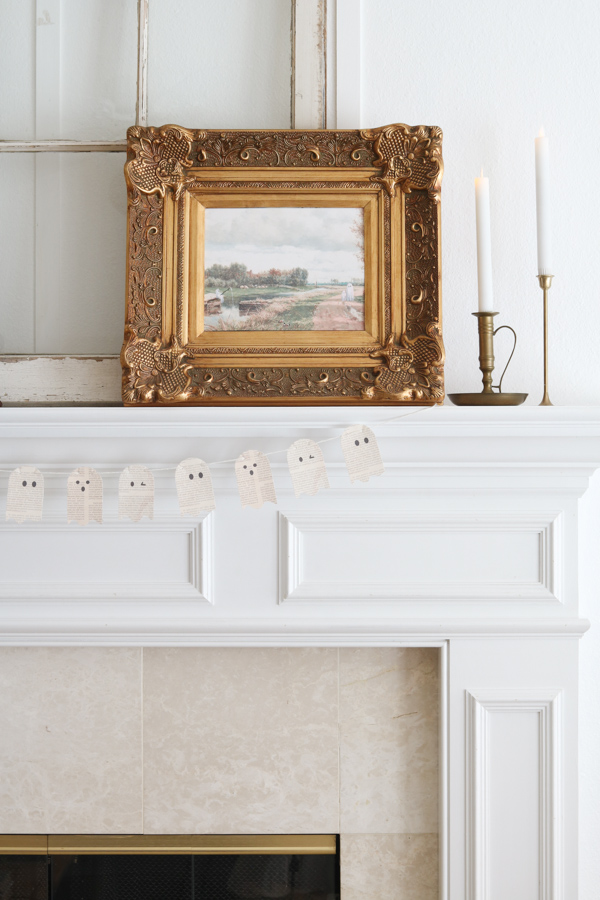
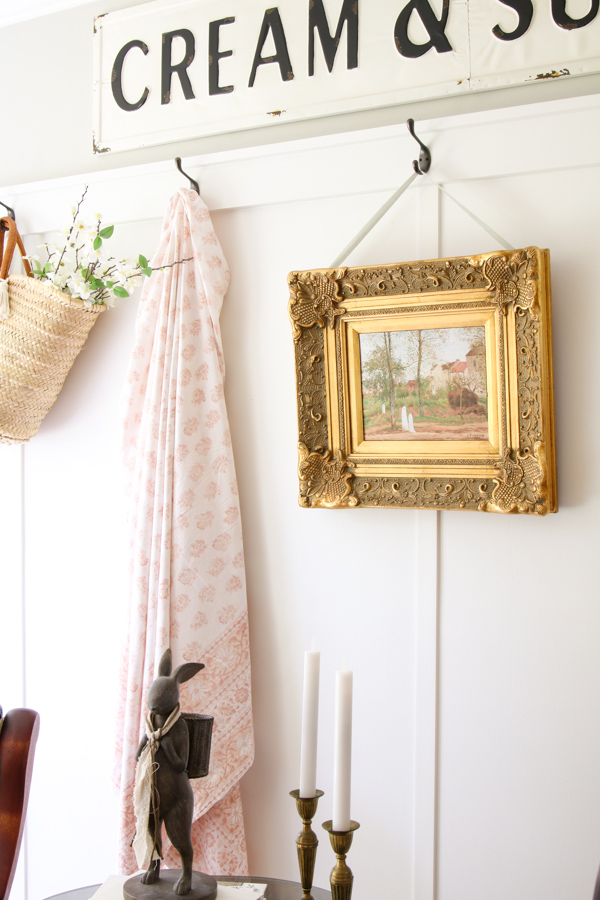
There are so many ways you can decorate with vintage ghost paintings. You can place your design over another painting and decorate your mantel.

Add some brass candles and a fun book page ghost garland. We offer this book page ghost garland printable in our Etsy shop, too. I love these cute little ghosts!
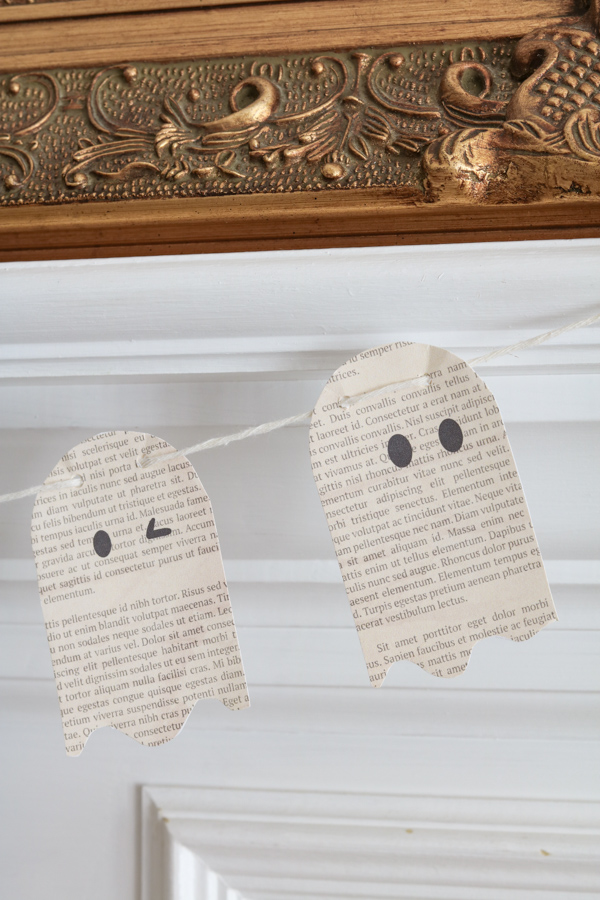
Another fun and inexpensive Halloween decoration is this ghost garland.
Now, another idea is to place your art on your bookcases. I was so inspired that I decided to try this DIY. Here is the vintage museum print I painted ghosts on from our Etsy shop. Can you see the ghost in the window? It's like a little haunted house.
It also looks great nailed to the front of your bookcase, too. This looks fabulous if you have a library.
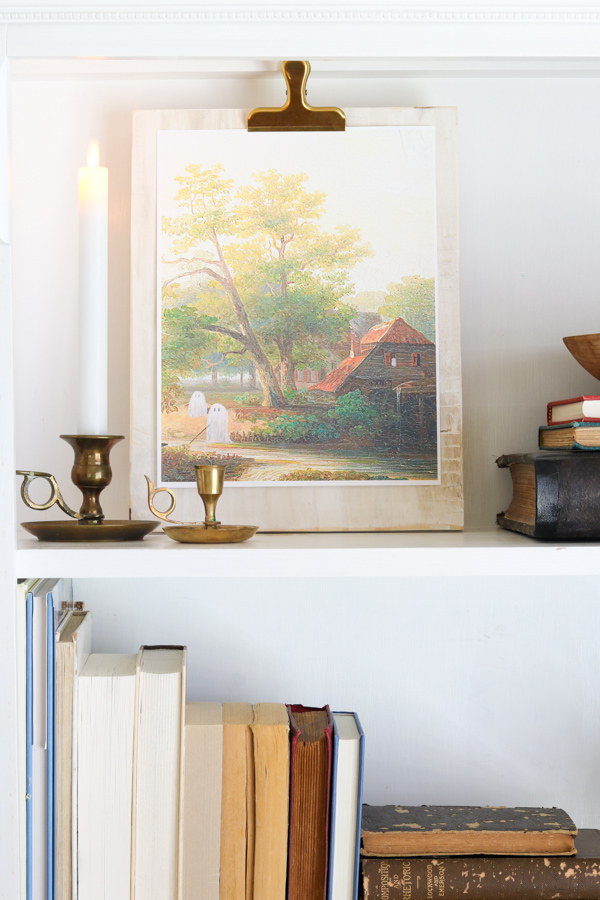
Here is a close-up. That is not bad for my first time.
And don't forget a gallery wall or a wall with hanging pieces, like my kitchen sitting room. Gallery walls are perfect for adding some ghost art. If you want to learn how to hang a gallery wall, check out my post Easy Way to Hang Paintings and Create a Gallery Wall.
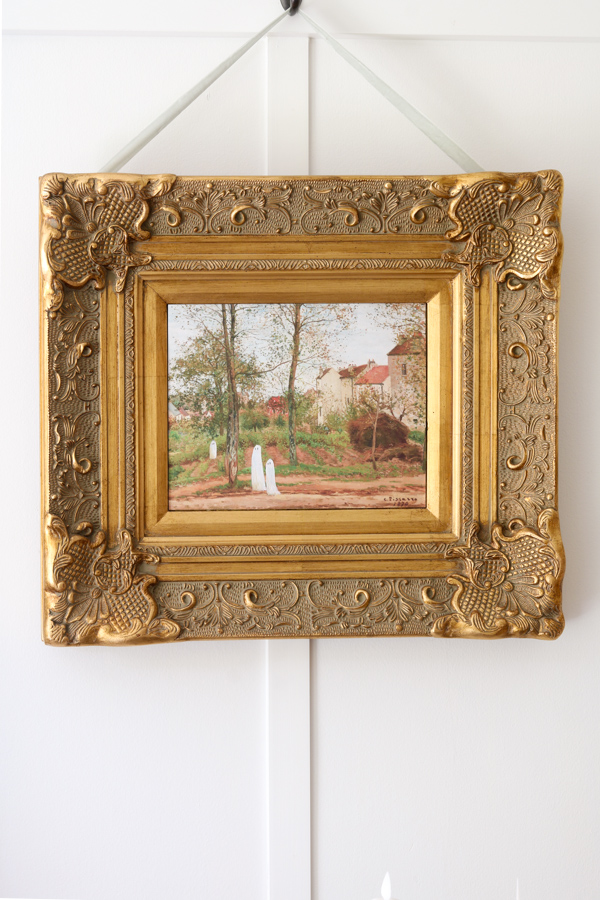
Here is a close-up. I made these ghosts skinnier and added warm tones to match the painting.
I only need some fall and Halloween decorations because I have a vintage ghost painting on my gallery wall.
DIY Ghost Painting FAQ
What kind of paint do you use for a ghost painting? White acrylic paint works perfectly for this project. It's inexpensive, easy to find at any craft store, and dries quickly between layers. A small bottle is all you need.
Can I paint a ghost on a real oil painting? Yes, but use caution. Acrylic paint will adhere to most surfaces, but if the painting has a glossy varnish, lightly sand the area first with fine-grit sandpaper so the paint has something to grip.
Do I need to be good at art to do this? Not at all. Ghosts are forgiving shapes — round at the top, soft and flowing at the bottom. The less perfect, the more ghostly they look.
Where is the best place to find thrift store paintings for this project? Goodwill, Habitat for Humanity ReStores, estate sales, and antique malls are all great sources. Look for landscape paintings with open sky or open ground — those give your ghost room to float.
What size painting works best? Medium-sized paintings in the 8×10 to 16×20 range are the easiest to work with. Smaller paintings can feel cramped for the ghost shape.
Final Thoughts
There you have it — a complete diy ghost painting from start to finish. This is one of those Halloween projects that looks like you spent a lot of time and money, but the whole thing comes together for just a few dollars. Acrylic paint is inexpensive, and the printables in our Etsy shop are always on sale, making them under $5.
And don't forget your local thrift store for art.
If you want vintage art with painted ghosts but don't want to waste time or effort, we have added all three of our vintage ghost prints to our Etsy shop.
Now that you know how to paint a ghost and have ideas on where to decorate with your original painting, what are you thinking? Are you going to give this a try? If so, I would love to hear your thoughts in the comments.
If you love the look of vintage art in your home, you'll love my book Vintage Nest — it's full of ideas for decorating with antiques and thrift finds.
Happy Decorating!

How to Paint a Ghost on a Vintage or Thrifted Painting
Trending on Tiktok is the most fun and cutest Halloween thrift art idea, where people shop for old pieces of art, prints, and oil paintings and paint adorable ghosts on them. We thought you might like some pointers on how to paint a ghost along with decorating ideas.
Materials
Instructions
- Determine Placement of Ghost on Art - For your first step, look at the landscape of your painting and think about natural places people would be standing, walking, or sitting. You can have a lot of fun here by thinking through funny places for your ghosts to reside.
- Paint Bottom Layer of Ghost - When painting your ghosts think in layers. Begin with the bottom layer. White will be the base color but to give it a vintage look, Hannah mixed a spec of black into the white and painted right over the people, creating the ghost shape by following the round shape of their heads and brushing in long strokes to the ground.
- Paint Top Layer to Ghost - Next, let that first coat of paint dry; you can use a blow dryer on a cool setting and then go over the ghost with another layer of paint. Here is a tip. When making those long brush strokes leave them a little unfinished and scraggly at the bottom. This will give the ghost a floating appearance and be more realistic.
- Paint Shadows and Eyes to Ghost - Use the same technique but add another black dot to the white to get a gray color. Then think about the folds of the ghost's sheet or skirt and paint the gray mix of paint within the creases. The slightly dark paint gives the ghost depth and realism. It also helps to look at the sun's direction in the original painting. If the sun comes in from the right, the ghost will have more shadow on his left side. Last, take a fine-tip paintbrush, or use a fine-tip black pen and add the eyes. If your ghost is doing something, add that in now as well.
- Brush on Decoupage - Now that we have everything painted consider adding some hard coat decoupage following the original strokes of the original artist, especially if you printed one of our prints. This will give your print a realistic oil painting look.
Notes
There are so many ways you can decorate with vintage ghost paintings. You can place your design over another painting and decorate your mantel. Or you can place your art on your bookcases. And don't forget a gallery wall or a wall with hanging pieces is another great place for your ghost painting.
I love these! So creative and fun! The pictures were perfect for the little ghosts.
Thank you! 🙂
Cute idea! I can’t wait to try this. What’s the surprise at the end?😊
Thank you! The surprise was the last painting that I added at the last minute. Sorry, I think I forgot to share that it was the surprise. LOL!