

Want to show Mom you care without breaking the bank? Make her this beautiful Mother's day flower printable DIY present in just minutes – with only a few simple supplies from the Dollar Tree.
You don’t have to be an experienced crafter to pull this off – with this easy DIY project, I’ll show you how to make a timeless, handmade gift that’s sure to make any mom smile. Plus, the whole thing can be finished in less than thirty minutes.
In this article, I’ll walk you through the materials and steps needed and where to get a birth month flower printable, so you can customize Mom’s gift with her birth month flower or her children. So if you’re in a bind and don’t have time to head to the store, don’t worry – your Mom won’t know the difference with this sweet and simple DIY!
Now let's get started making the best Mother's day flower printable DIY to surprise your mom, grandma, aunt or someone special.
Mother's Day Flower Printable DIY
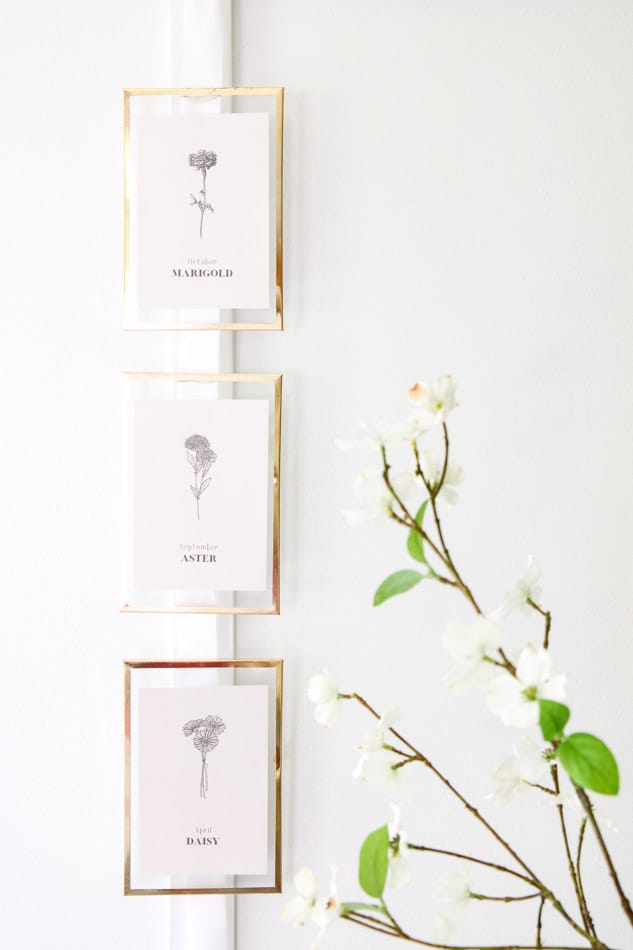
Anyone can print out a flower on Etsy and frame it for mom but for this project, you are printing out the birth month flower for each of Mom's children. These birth month flowers come in a neutral background color and a white background so this wall hanging will work perfectly with all design styles.
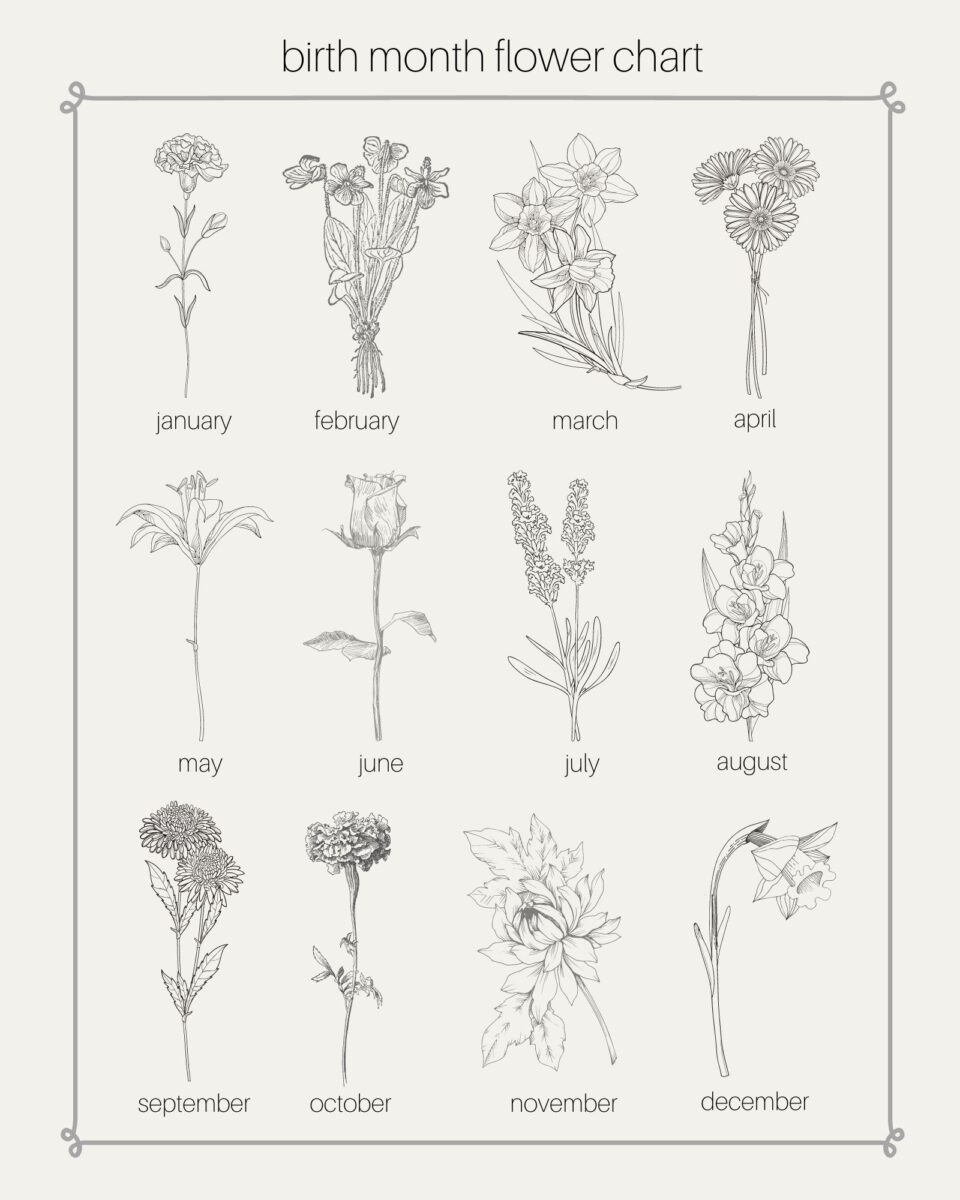
What is the flower for each birth month?
Here is a list of each birth month flower, along with a birth month flower chart.
- January: Carnation and Snowdrop
- February: Violet and Primrose
- March: Daffodil and Jonquil
- April: Daisy and Sweet Pea
- May: Lily of the Valley and Hawthorn
- June: Rose and Honeysuckle
- July: Larkspur and Water Lily
- August: Gladiolus and Poppy
- September: Aster and Morning Glory
- October: Marigold and Cosmos
- November: Chrysanthemums
- December: Narcissus and Holly
Birth month flower printables
Let me explain birth month flower printables. For every month of the year, there is a flower that goes with that month. So we took that flower and created a printable and then added the name of the flower and the month on the bottom.
These birth month flower printables look like botanical prints. They are a classic, timeless design.
Mom will cherish seeing her baby's birth month flowers and always remember the time you spend making her something special. Now let's get started making a Mother's day gallery wall hanging.
DIY Dollar Store Birth Month Flower Wall Hanging
Here is what you will need to make this Mother's day flower wall hanging. All these items can be purchased at your local Dollar Tree, and the birth month flower printable comes from Etsy.
Step 1: Mother's Day Flower Wall Hanging Supplies
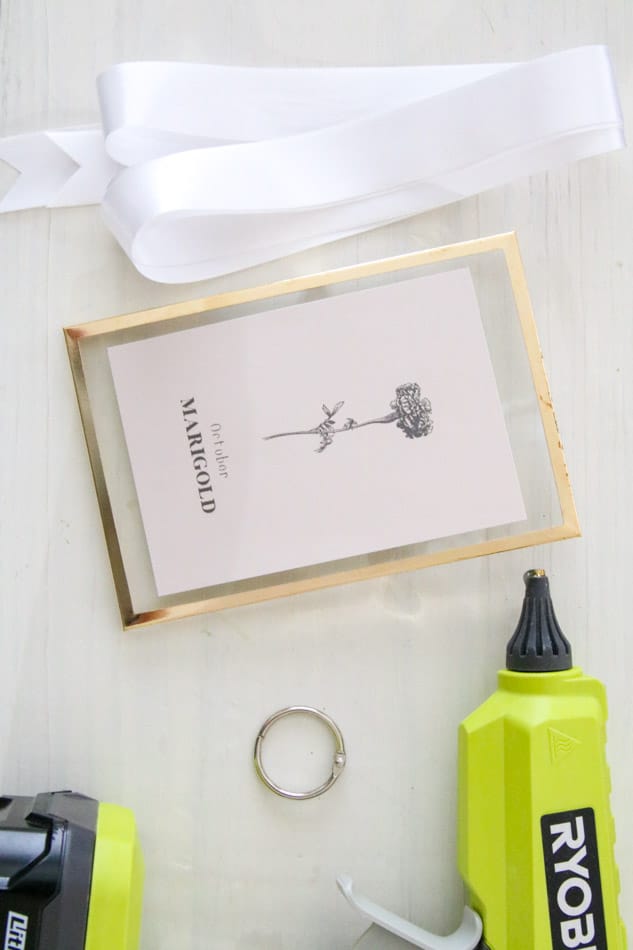
- Birth month flower printable (you can buy the whole birth month flower set or individuals but make sure to print one out for each of Mom's children)
- Dollar Tree gold floating frames
- Double-sided tape if you are suspending the printable inside the glass
- 1″ satin or grosgrain ribbon
- Glue gun and glue
- Scissors
- Round book ring metal piece (I used book rings). Look in the craft, school supply, or jewelry making section for something that will work and is a good deal
Now that you have all your craft supplies let's go to step two which is printing your birth month flower printables.
The first thing to begin making this DIY dollar tree mother's day gift is by printing your birth month flowers.
RATHER WATCH THAN READ?
Step 2: Download, Print and Cut Printables
After you select each birth month or buy the whole set download the months you plan to use and then print them to the size of your picture frame on cardstock. This is where your Dollar Tree store items come in.
My floating frames are 4 x 6, so I selected the 4 x 6 option in the advanced setting when I went to print them.
On my little picture frames, I didn't want them to go edge to edge so after I printed them the size of my frame I used the glass from my frame and placed it over the image. Then I used a pencil and drew around the edge. Next, I used my paper cutter to cut it but if you only have scissors that work great too.
If you love homemade paper, try this how to make homemade paper at-home tutorial. This gift idea for mom would look amazing with vintage paper.
For my frames, I decided to have a floating piece of art inside on the glass so I trimmed a little extra off around the edges.

Step 3: How to Frame Floating Printable Art
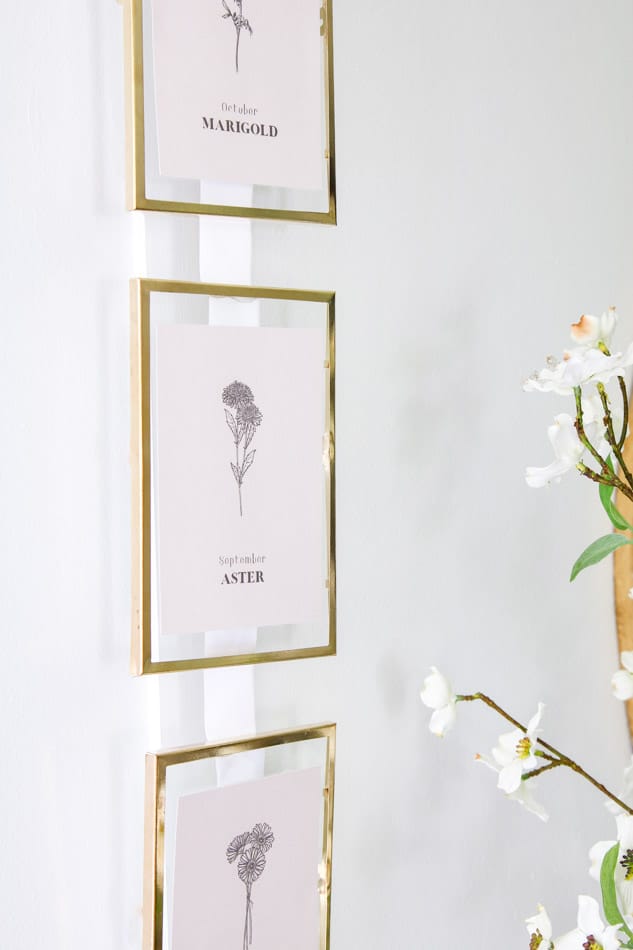
Now that you have your art cut to size let me share how I framed these designs where the art is floating in the middle. There are two ways you can do this. First, you can sandwich the piece of art between two pieces of glass or you can place the print on the top of the glass.
If your floating frame comes with a back and only one piece of glass then the latter will work for you but you need to remove the back so that you can see through the glass. But either way, you will need double-sided tape to adhere the print to the glass.
Simply put one small piece of double-sided tape to a piece of glass and attach the printable to the picture frame's glass. If you have a front piece of glass,, you can set it on top.
Note: After making and hanging this piece, I recommend adding double-sided tape to the corners instead. I did notice it sticking out a little around the edges because nothing is holding it down. If you have a second piece of glass, I think you are good with just one piece of double-sided tape.
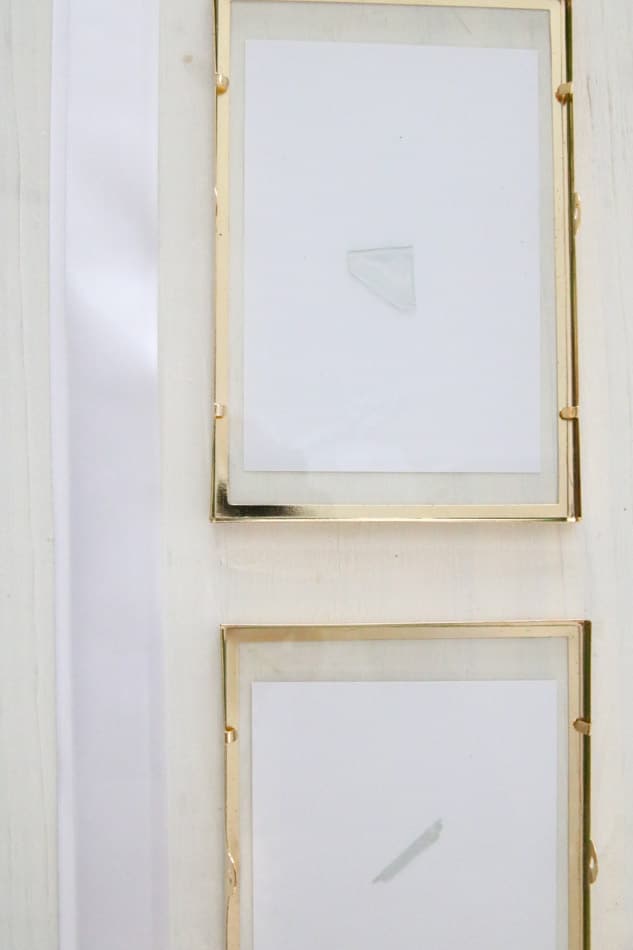
Then place the glass with the print inside the frame and press down on the tabs on the back as tight as you can.
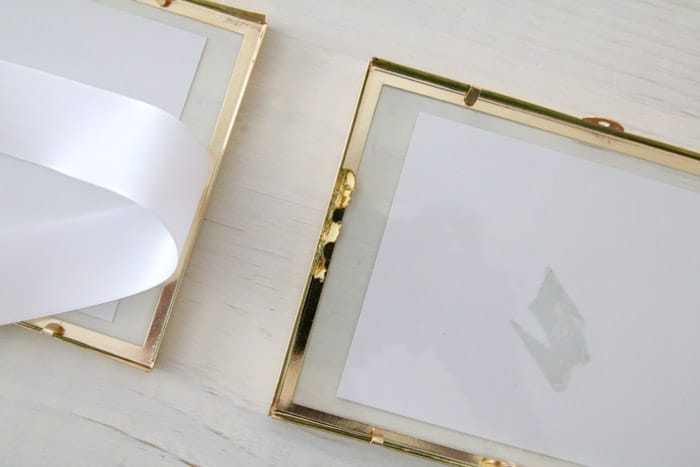
Step 4: How to Make a Framed Collage Wall Hanging
Now that you have all your printables framed let's create a collage wall hanging. Begin by placing all the frames in a row the distance apart to your liking, or you can use my measurement of 1″ from the bottom of one to the top of the other.
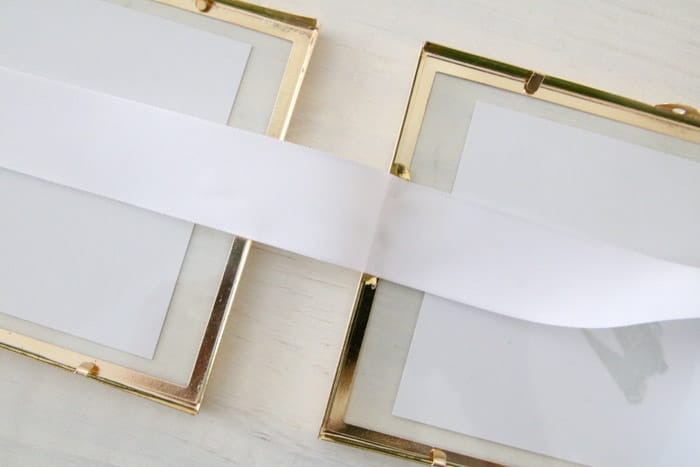
Next, turn them over so you can see the back of the frames, and then measure from the very top to the very bottom. Take that measurement and add six more inches. If you are using three frames that are 4 x 6 then you should have a measurement of 20″. Then double that number, and this is how long your ribbon needs to be cut.
Grab your scissors and cut a piece of ribbon the number you just figured. If you are doing one exactly like mine, you will need to cut a 40″ piece of ribbon.
Once you have your ribbon trim a v shape into the ends and run the book ring through the ribbon, matching the ribbon ends.
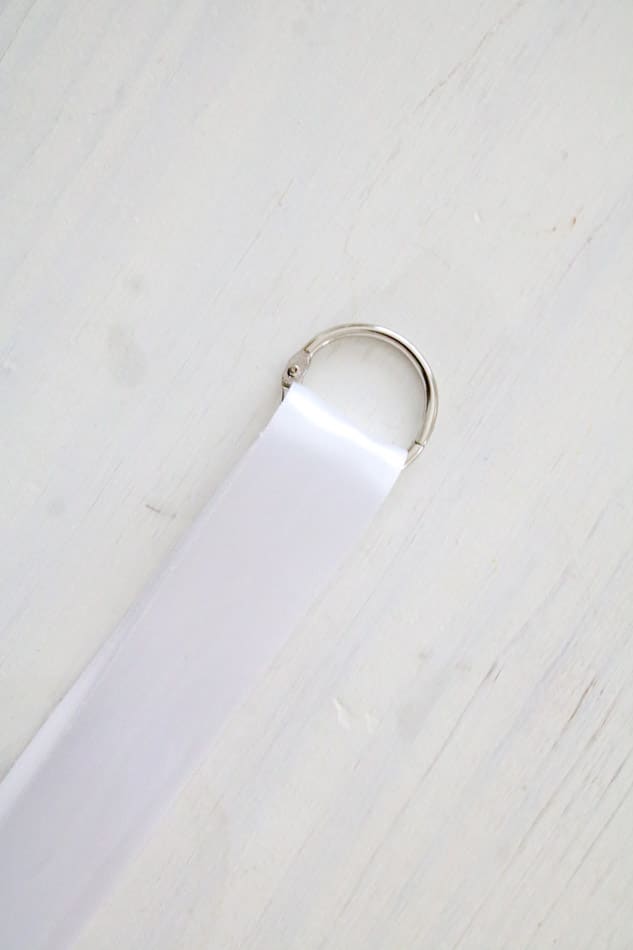
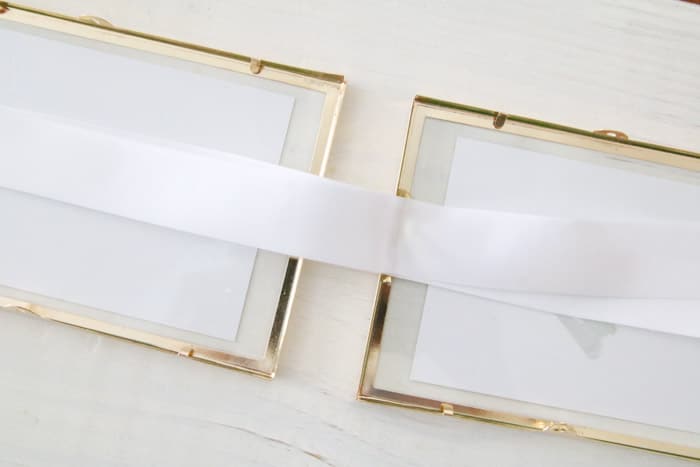
Now it is time to attach the ribbon to the back of the frames. First, measure down your ribbon 3 inches and mark it with a straight pin or something. Remember that your ribbon is folded in half, so you measure down three inches from the ring where it is folded.
Then measure and mark the center of the top of the back of each frame.
Step 5: Glue Ribbon to Frames
Get your hot glue gun ready. Next, add a thin glue line along the back top of the picture frame. Make sure not to put too much glue where you will see it from the front.
Then measure down three inches on the ribbon and place one piece into the glue.
Once dry and secure, add another thin line of glue and place the other half of the ribbon.
Repeat this step on the top of each frame until you have all the ribbon glued to the frames. Since your frames are already 1″ apart, you shouldn't have to measure anymore. Just apply glue and place the ribbon.
Now that you are all finished let's see the finished product and talk about ideas on where to hang your Mother's Day Dollar Tree craft.
SHOP THE POST:

DIY DOLLAR TREE MOTHER'S DAY GIFT
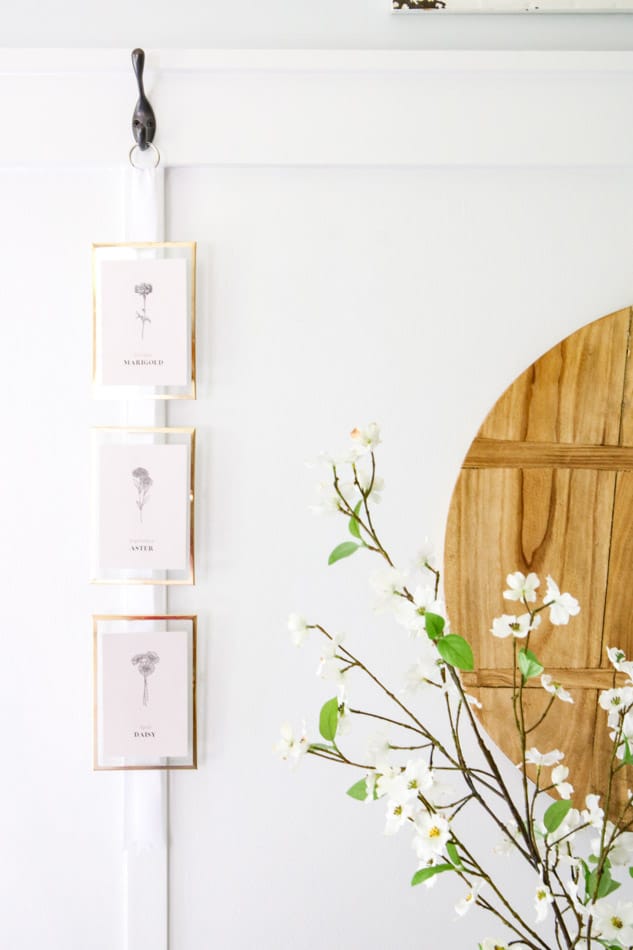
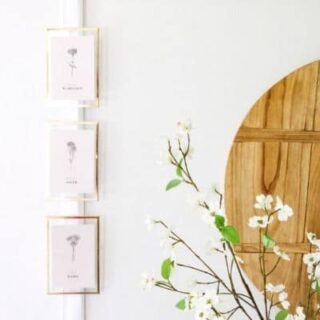
I have these hooks in our kitchen sitting area, and this sweet Mother's day printable wall hanging was perfect for displaying along with our old breadboard and dogwood flowers.
DIY Mother’s Day gifts are a great way to honor your special family member. The best part about this Mother's day dollar tree craft is that it is one of a kind, and personalized to your family. Who knew that Dollar Tree items could make the best handmade gifts?
CONCLUSION
Because this printable can be printed in all different sizes from 8 x 10 to 2 x 3, you can make this collage and hang it on a gallery wall, on a hook with other hanging decorations, or simply as a stand-alone piece on a small wall.
A great way to give this precious homemade Mother's day gift to mom is at a Mother's day brunch you put on for Mom. Here are ideas for a Mother's day brunch and another for garden party decoration ideas. There are many cute ways to honor your mom. I would love to hear your Mother's Day ideas!
I hope you love this Mother's Day Dollar Tree craft. It's a great gift idea with a personal touch for a special mom. DIY crafts are always my favorite things. And if you're not feeling this idea for Mom we have loads of other DIY printable ideas. I am sure you will find something your mom will love there.
But here is one last close-up of this cheap Mother's day printable DIY idea using birth month flowers art.
So many great DIY craft ideas start at my local Dollar Store and local craft store. DIY Mother’s Day gifts often make the perfect gift. What better way to celebrate someone who means so much to you? It's an easy Mother's Day gift idea that will be a big hit. If you love giving DIY gifts, check out these posts:
I hope you have enjoyed this Mother's Day Dollar Tree craft tutorial. If you decide making a gift for mom is not in your schedule, try these Mother's day farmhouse gift ideas. I hope you have a wonderful Mother's day!
Happy Decorating!

Mother's Day Dollar Tree Craft
Materials
Instructions
- The first thing to begin making this DIY dollar tree mother's day gift is by printing your birth month flowers.
- After you select each birth month or buy the whole set download the months you plan to use and then print them to the size of your picture frame on cardstock. This is where your Dollar Tree store items come in. My floating frames are 4 x 6 so I selected the 4 x 6 option in the advanced setting when I went to print them.
- On my little picture frames, I didn't want them to go edge to edge so after I printed them the size of my frame I used the glass from my frame and placed it over the image. Then I used a pencil and drew around the edge. Next, I used my paper cutter to cut it but if you only have scissors that work great too.
- Now that you have your art cut to size let me share how I framed these designs where the art is floating in the middle. There are two ways you can do this. First, you can sandwich the piece of art between two pieces of glass or you can place the print on the top of the glass. If your floating frame comes with a back and only one piece of glass then the latter will work for you but you need to remove the back so that you can see through the glass. But either way, you will need double-sided tape to adhere the print to the glass. Simply put one small piece of double-sided tape to a piece of glass and attach the printable to the glass of the picture frame. If you have a front piece of glass you can go ahead and set it on top. Then place the glass with print on it inside the frame and press down on the tabs on the back as tight as you can.
- Now that you have all your printables framed let's create a collage wall hanging. Begin by placing all the frames in a row the distance apart to your liking or you can use my measurement of 1" from the bottom of one to the top of the other.
- Next, turn them over so you can see the back of the frames and then measure from the very top to the very bottom. Take that measurement and add six more inches. If you are using three frames that are 4 x 6 then you should have a measurement of 20". Then double that number and this is how long your ribbon needs to be cut.
- Grab your scissors and cut a piece of ribbon the number you just figured. If you are doing one exactly like mine you will need to cut a 40" piece of ribbon.
- Once you have your ribbon trim a v shape into the ends and run the book ring through the ribbon matching the ribbon ends.
- Now it is time to attach the ribbon to the back of the frames. First, measure down on your ribbon 3 inches and mark it with a straight pin or something. Remember that your ribbon is folded in half so you are measuring down three inches from the ring where it is folded.
- Then measure and mark the center of the top of the back of each frame.
- Next, add a thin line of glue along the back top of the picture frame. Make sure to not put too much glue where you will see it from the front.
- Then measure down three inches on the ribbon and place the one piece of ribbon into the glue.
- Once that is dry and secure add another thin line of glue and place the other half of the ribbon.
- Repeat this step on the top of each frame until you have all the ribbon glued to the frames. Since your frames are already 1" apart you shouldn't have to measure anymore. Just apply glue and place the ribbon.
- Because this printable can be printed in all different sizes from 8 x 10 to 2 x 3 you can make this collage and hang it with a gallery wall, on a hook with other hanging decorations, or simply as a stand-alone piece on a small wall.
Notes
After making and hanging this piece I recommend adding double-sided tape to the corners instead. I did notice it sticking out a little around the edges because there is nothing holding it down. If you have a second piece of glass I think you are good with just one piece of double-sided tape.