
Looking to add a personalized touch to your decor or create a meaningful gift? Dive into this idea of a birth month flower candle holder DIY. Combine floral beauty with candlelight for a customized touch. Join me as we craft a charming candle holder adorned with meaningful blooms to decorate your home or gift to a friend or family.
When decorating your home, homemade decor brings a personal touch to your design so when this idea popped into my head I knew it would be a special piece to add to our home décor or to give as a gift. This birth month flower candle holder DIY is easy to follow and only takes a few hours at most to complete.
So let's begin this simple project by collection some supplies and then we will jump right into the steps of crafting this flower candle holder.
Birth Month Flower Candle Holder DIY
There's no better way to start any fun DIY project then by gathering supplies. Trust me, it's like packing for a hiking trip – you want to make sure you have everything you need before you begin your journey.
Supplies:
So, grab your supply list and save yourself a frustrating mid-project dash to the store. Ready, set, go! Let's get to crafting.
- Glass cylinder – with or without bottom
- Birth Month Flower printables (individual months or bundle)
- Fine tip paint marker or chalk marker
- Clear tape
- Scissors
- Taper candle holder or small glass plate with pillar candle
Now that we have all the supplies, let's begin with the first step of crafting a floral candle holder. Read on for the full details.
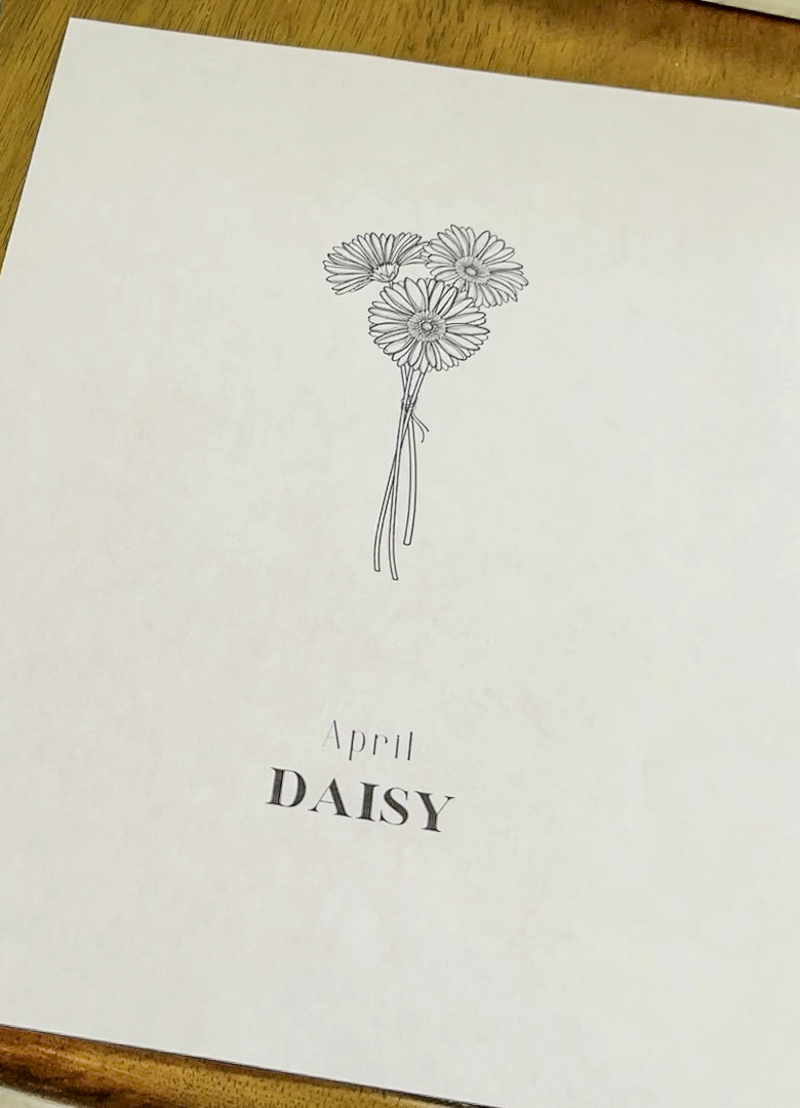
Step One: Print Birth Month Flowers
Pick out which flowers you would like for your floral meadow and download them to print. Next print each one in two different sizes. I choose 8 1/2 x 11 size and then scaled it down in printer setting to 6 x 9 roughly. Print two of each size.
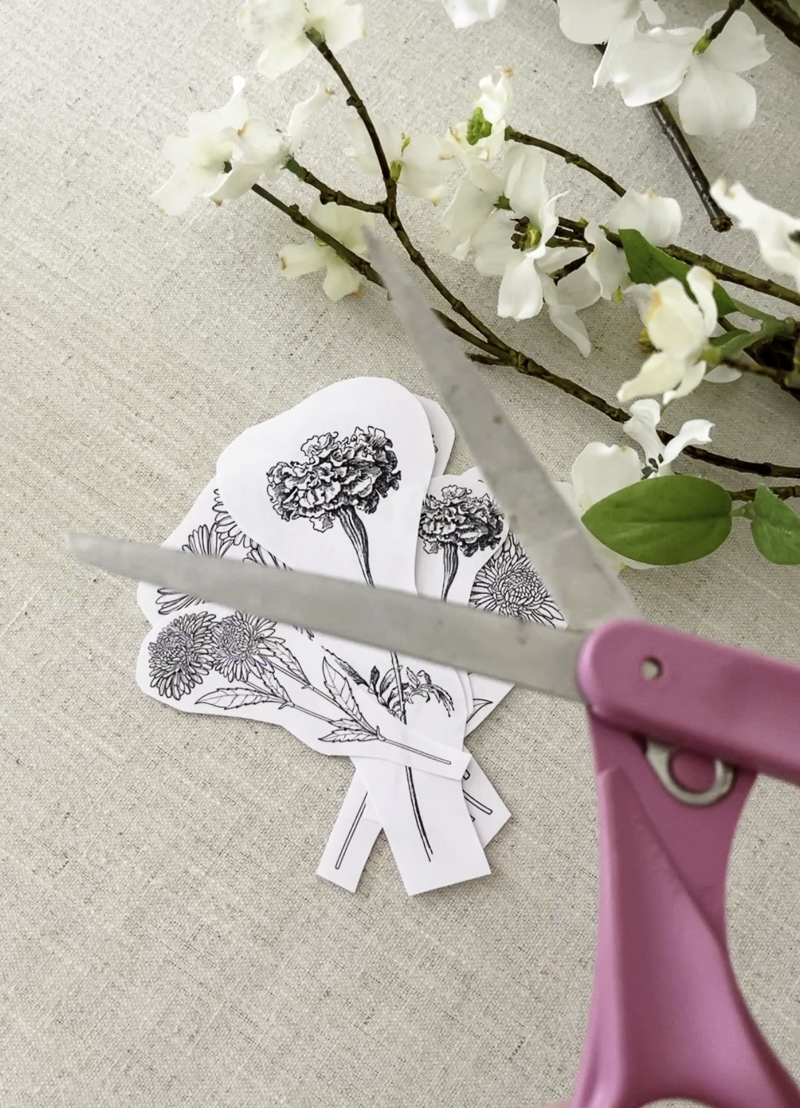
Step Two: Cut out Flowers
Now cut out all the flowers and stems cutting around the shape of the flowers. Continue by cutting out all flowers before going to the best step.
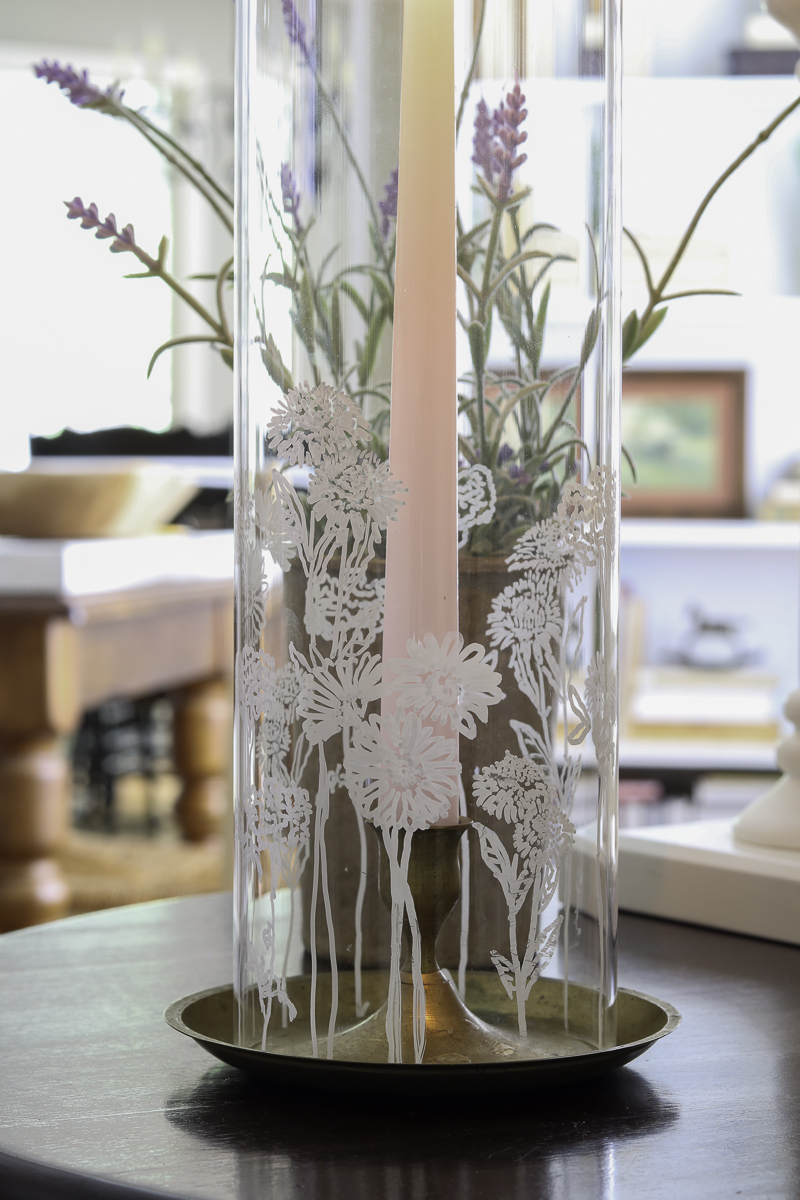
Your birth month flowers will look like this when they are done.

Step Three: Tape Flowers to Cylinder
Next, take one of the flowers and face it towards you. Then remove a small piece of tape and adhere it to the backside of the flower with the sticky part facing up.
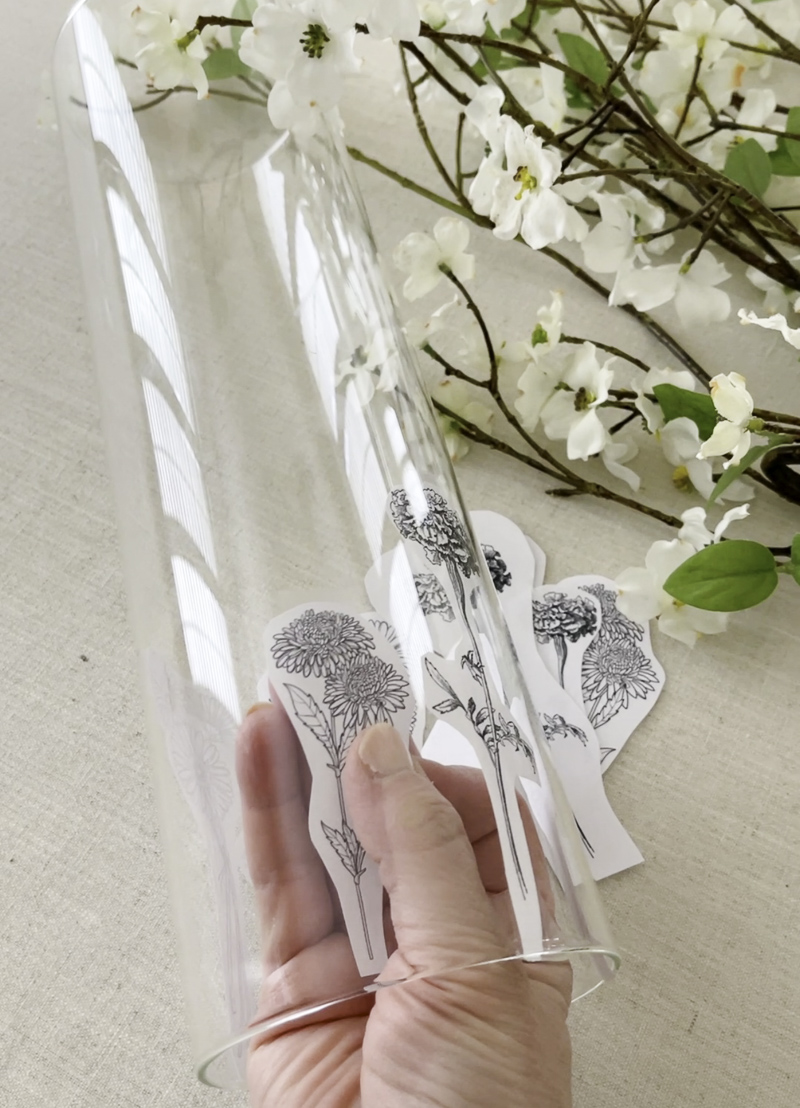
Once you have the tape adhered to the flower slip the flower into the jar and tape it into place.
Repeat this step with all the flowers going all the way around the glass jar. Vary the heights of the flowers. I made my flowers have long stems because my cylinder was very tall but if you have a smaller Dollar Tree glass cylinder then you may not have to make your flowers really tall.
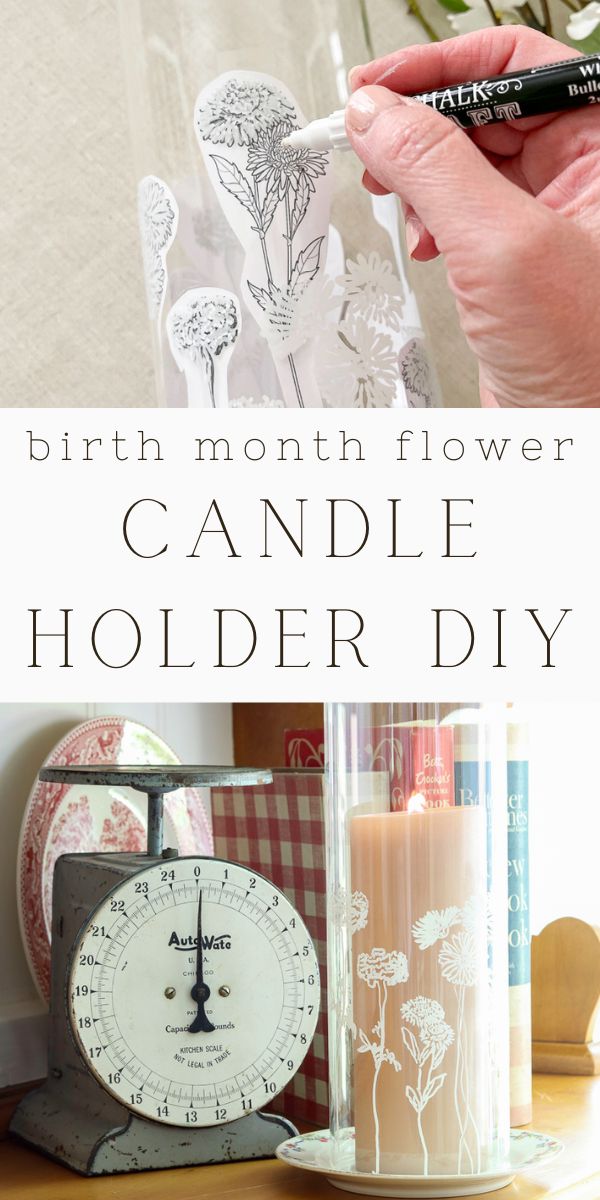
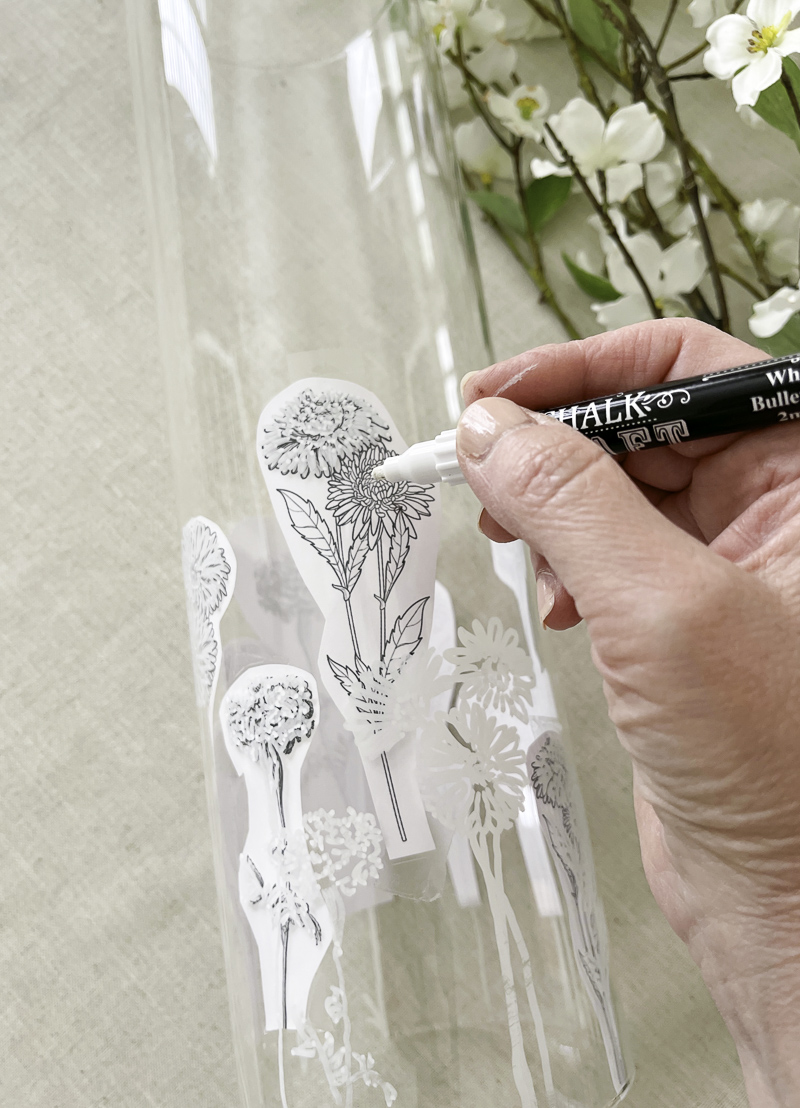
Part Four: Paint Flowers
Now after your marker is primed and ready begin at the top and start tracing the flower. Move your way down, and once you are finished, turn the cylinder in the direction where your hand will not be touching the paint. I am right-handed, so I turned mine to the left.
There may be slight differences between your flowers, but that's part of the charm when creating a DIY project.
Part Five: Remove the Printable Flowers
Once you have finished painting all the “faux flowers” you simply remove the flowers from inside.
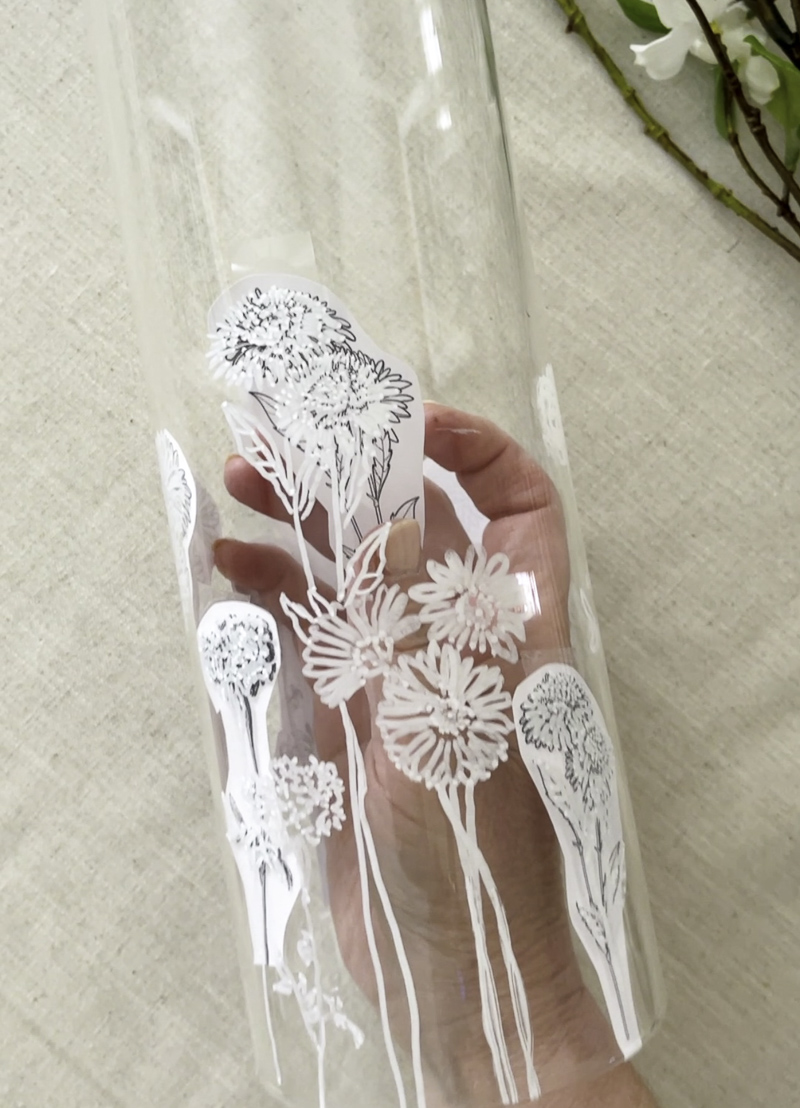
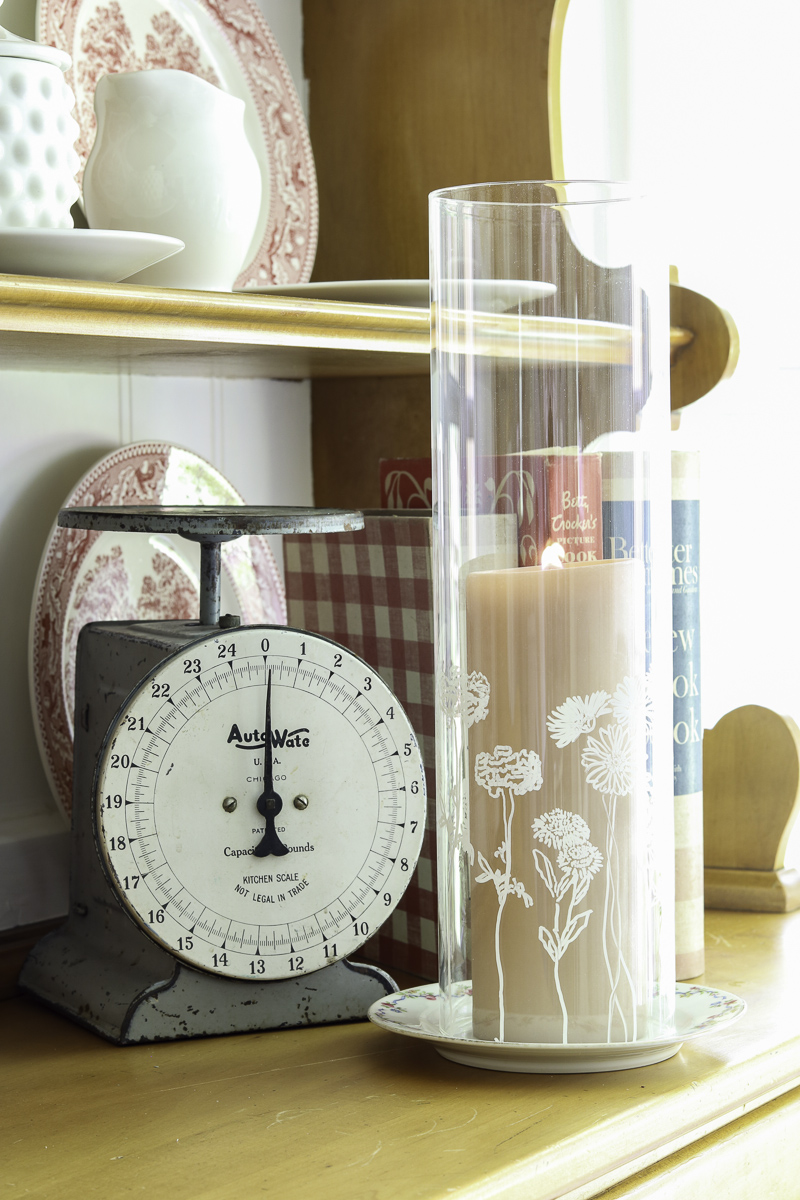
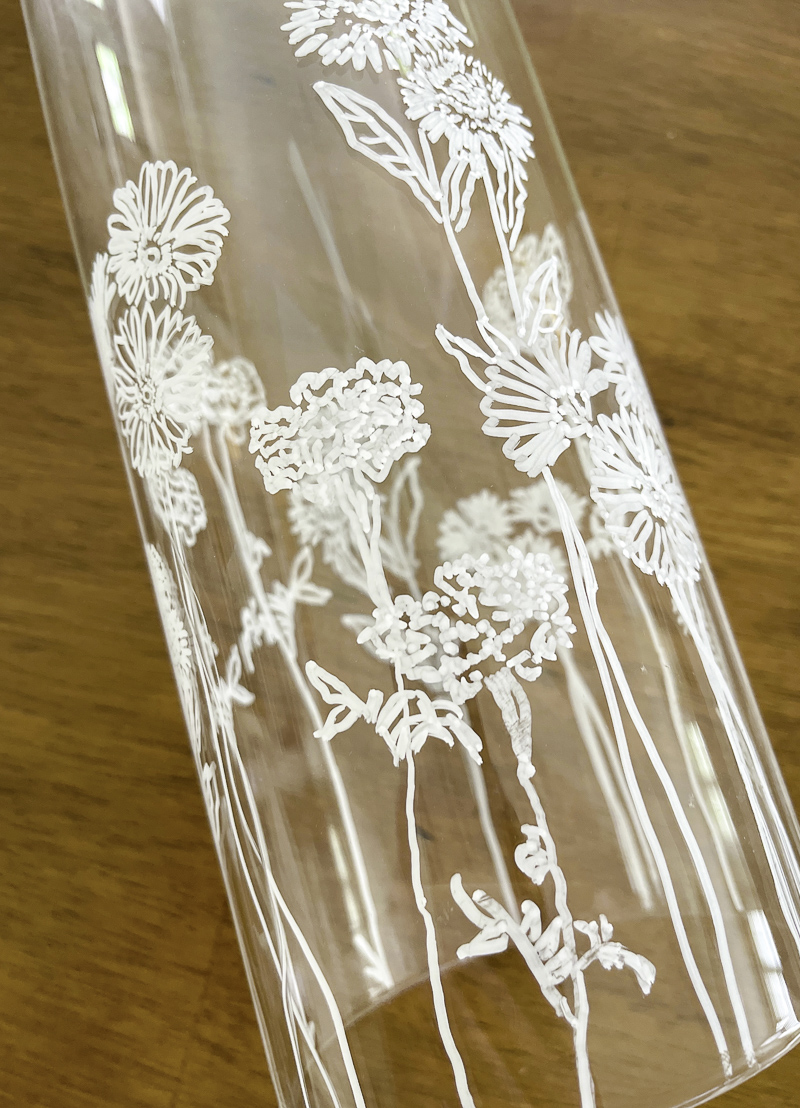
And now your birth month flower candle holder is finished. It is time to decorate.
Part Six: Add Candle to Holder
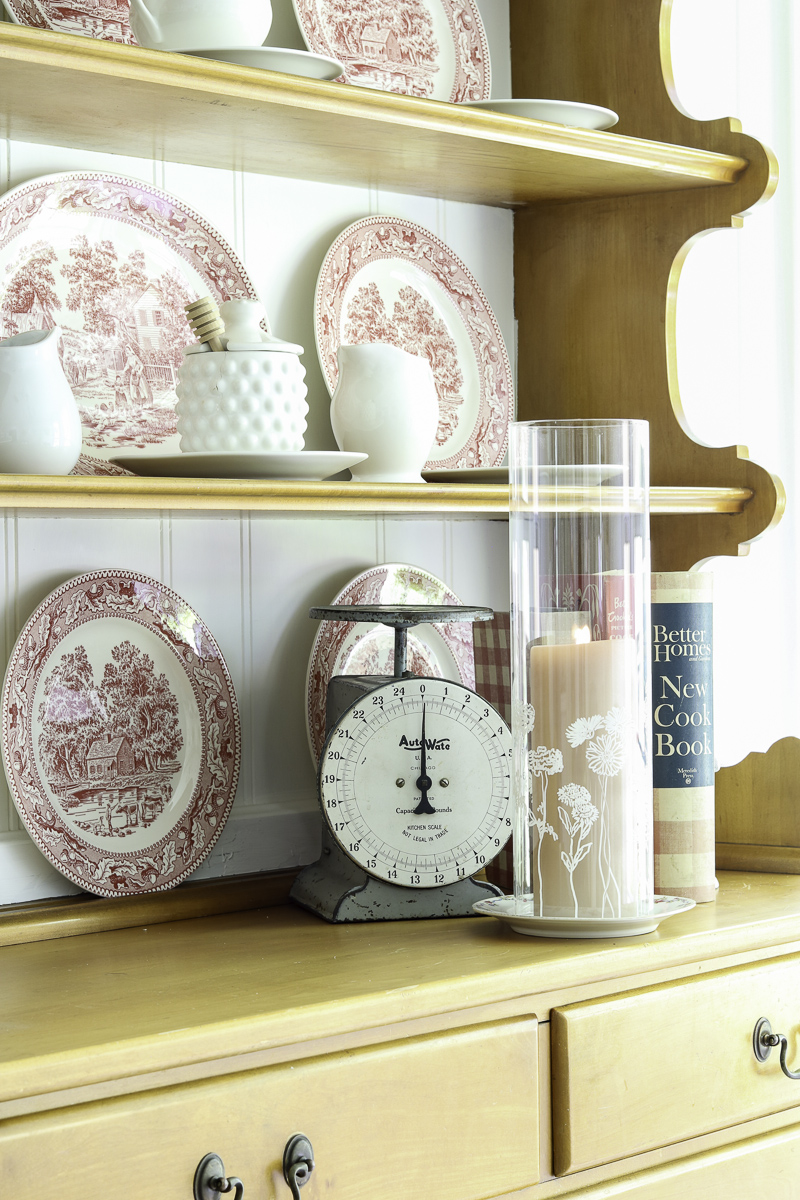
Last, all you need to do is add a candle, candle holder, or plate to catch wax melts. I tested the candle holder with various candles and bottoms. I chose the tallest candle I had, a pillar candle. It was the perfect size. This one was my favorite because the pillar candle showed off the design.
Where to Decorate with Your Flower Candle Holder
When it comes to decorating with your birth month flower personalized farmhouse candle jar, the possibilities are as endless as your imagination! These charming creations can add a touch of elegance and warmth to any space in your home, no matter your decor style. From country styling to modern decor, your flower candle holder will light up any room.
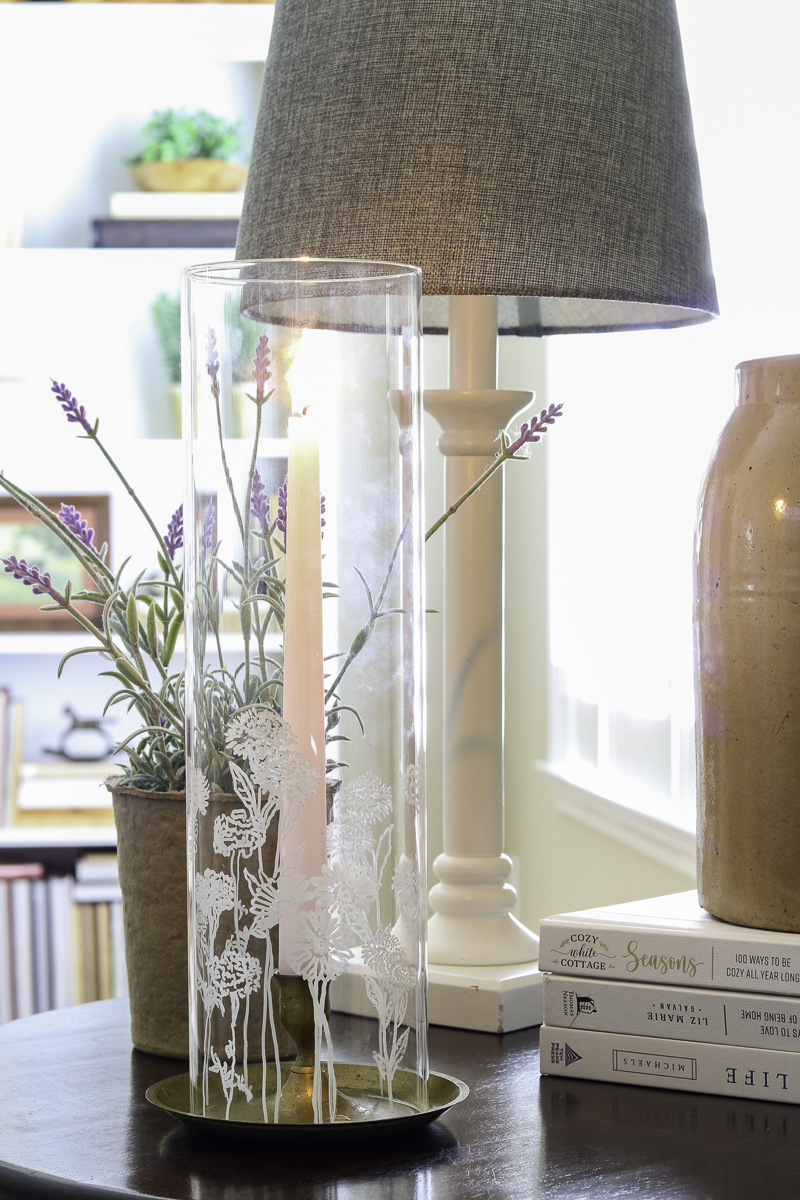
Place your floral candle holder on a brass candlestick holder and include a taper candle.
I sat this one in my living room on an end table. It looked so pretty and the flowers you can much better in person than in these photos.
Another idea is placing it as a centerpiece on your dining table for cozy family dinners or romantic evenings in.
They also make delightful accents on mantels, shelves, or coffee tables, infusing your living room with a soft, inviting glow.
Don't forget about the bathroom – a flower candle holder can transform a simple soak in the tub into a luxurious spa-like experience. And let's not overlook outdoor spaces!
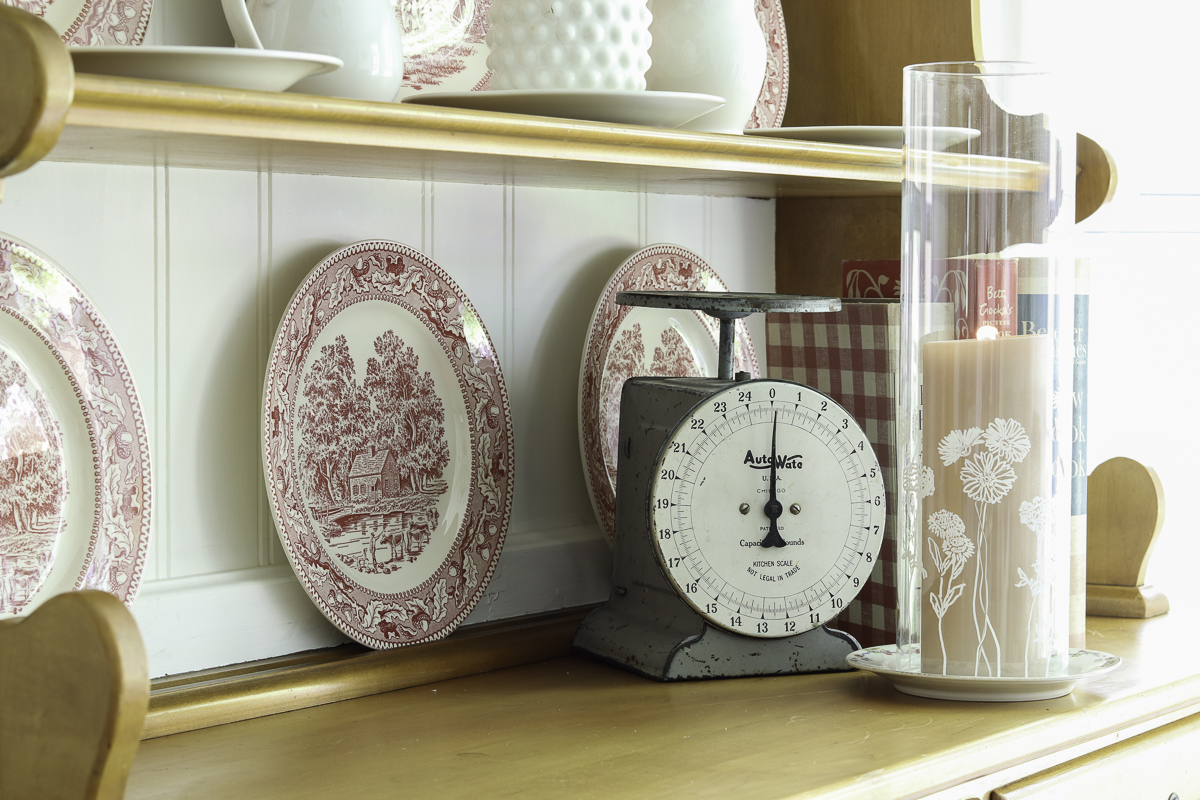
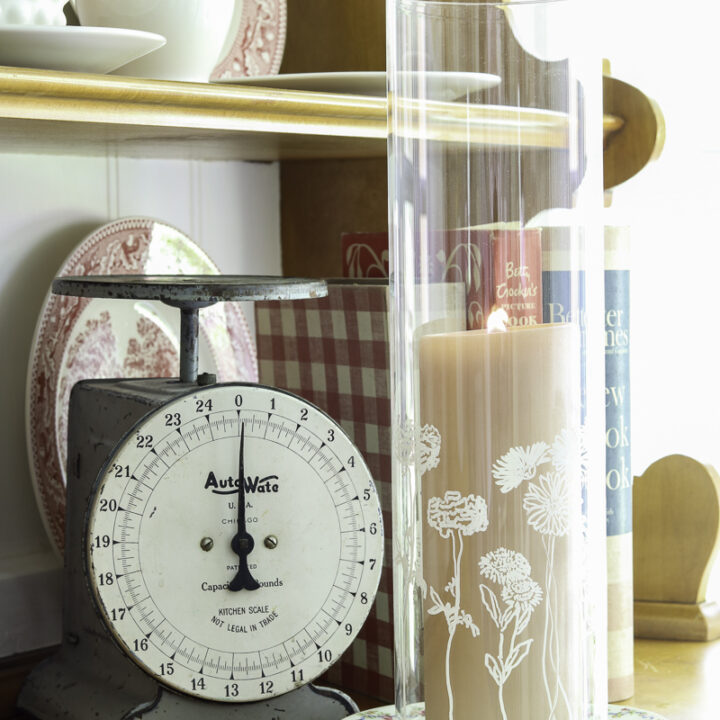
But my favorite is in our kitchen sitting room. I sat a tall pillar candle on an antique china bread plate. The pillar candle is a medium tone tan color which allows the flowers to pop.
Whether you're hosting a Mother's day dinner or enjoying a quiet evening on the patio, these candle holders can bring a touch of nature's beauty to your gatherings. So go ahead, let your creativity bloom and find the perfect spot to showcase your flower candle holder!
Ideas To Gift This Candle Holder?
Originally, when I began planning this DIY candle holder I did it with Mother's Day in mind. Imagine the look of awe when your mother opens this customized gift. Pick out the birth month flowers of Mom's children and add them to the field of flowers on the candle holder.
Another idea is to DIY these candle holders as birthday gifts. You can use the same flower, just like a gardener has planted all the same blooms. Last, consider this for a teacher gift. Find out her favorite flowers and paint the cylinder with all those flowers.
There are so many ideas and I can imagine you have thought of a few. Share in the comments who would be a good candidate to receive this birth month flower candle holder.
Final Thoughts
As you dive into this creative project, remember that it's not just about crafting something beautiful, but also about infusing it with special meaning and sentiment. So, take a moment to select the perfect blooms that hold significance to you or your loved ones, and let your imagination run wild as you bring them to life on the glass surface.
Looking for more Mother's Day DIYs? Check out these posts:
- Fun DIY Dollar Tree Craft Birth Month Flower Mother's Day Gift
- Create a Beautiful May Day Basket and a Letter for Mom
- How to Make Teacup Candles
- DIY Book Sleeve: Wrap Your Reads in Style & Protection
Thank you so much for stopping by and I hope this blog post has been helpful. Are you thinking of making this birth month flower candle holder diy project? I would love to know in the comments.
Happy Decorating!

Sentimental Glow: Birth Month Flower Candle Holder DIY
Combine floral beauty with candlelight for a customized touch. Join me as we craft a charming candle holder adorned with meaningful blooms to decorate your home or gift to a friend or family.
Materials
Instructions
- Pick out which flowers you would like for your floral meadow and download them to print. Next print each one in two different sizes.
- Now cut out all the flowers and stems cutting around the shape of the flowers. Continue by cutting out all flowers before going to the best step.
- Take one of the flowers and face it towards you then remove a small piece of tape and adhere it to the backside of the flower with the sticky part facing up.
- Once you have the tape adhered to the flower slip the flower into the jar and tape it into place.
- Repeat this step with all the flowers going all the way around the glass jar. Vary the heights of the flowers.
- Now after your marker is primed and ready begin at the top and start tracing the flower. Move your way down and then once you are finished turn the cylinder in the direction where you hand will not be touching the paint.
- Once you have finished painting all the flower you simply remove the flowers from inside.
- Last all you need to do is add a candle, candle holder or plate.